SCCM (A.K.A ConfigMgr) Explained
SCCM is Microsoft Microsoft Endpoint Manager Configuration Manager. This solution is used by most of the organizations in the world to manage their enterprise devices. This is the best resource to Learn and troubleshoot on issues.
How is SCCM (A.K.A ConfigMgr) Used?
SCCM solution is mainly used to manage Windows devices. But it has rich capability to manage and Mac OS devices as well. As per Microsoft, this tool is managing more than 75% of enterprise devices of the world. Linux and Unix devices are not supported by MEMCM (A.K.A Microsoft Endpoint Manager Configuration Manager)
How CAN SCCM Be Applied to Your Organization?
This solution can be used to install the application within your organization. OS deployment is another feature of this solution used within most of the enterprises. Another important use of this solution is to deploy patches across the enterprise and secure those devices.
There are 1000000 devices managed by this solution around the world. And SCCM device management solution is used within organizations to deploy millions of applications.
Server Client Application
This solution is a server-client application. All the managed clients’ inventory is stored in the CM SQL database.
SCCM Core infrastructure, Updates for Configuration Manager, Supported configurations for Configuration Manager, Cloud-attached management of CM, Co-management for Windows 10,
Manage clients on the internet, Windows as a service, CMPivot, Application management.
Other Uses for SCCM
SCCM can used for Manage apps from the Microsoft Store for Business, OS deployment, Introduction to OS deployment, Upgrade to Windows 10, Phased deployments, Software update management, Introduction to software updates management, Manage Office 365 ProPlus updates.
SCCM MVP community group is one of the known community groups in the IT Industry.
There have been 12 Tech Preview releases of SCCM CB, hundreds of new features, 14k code check-ins, and bug fixes, and now managing more than 100 million endpoints. In this post, we will learn more about the 2017 SCCM ConfigMgr Intune community around me.
I can see that Microsoft Intune releases new features every week. More details are available in “What’s new in Microsoft Intune.” Also, the Intune community is growing strong worldwide and in India.
During the Bangalore IT Pro event, I learned that 99% of SCCM admins (who attended the event) realized they had to learn Intune, and they started to learn Intune.
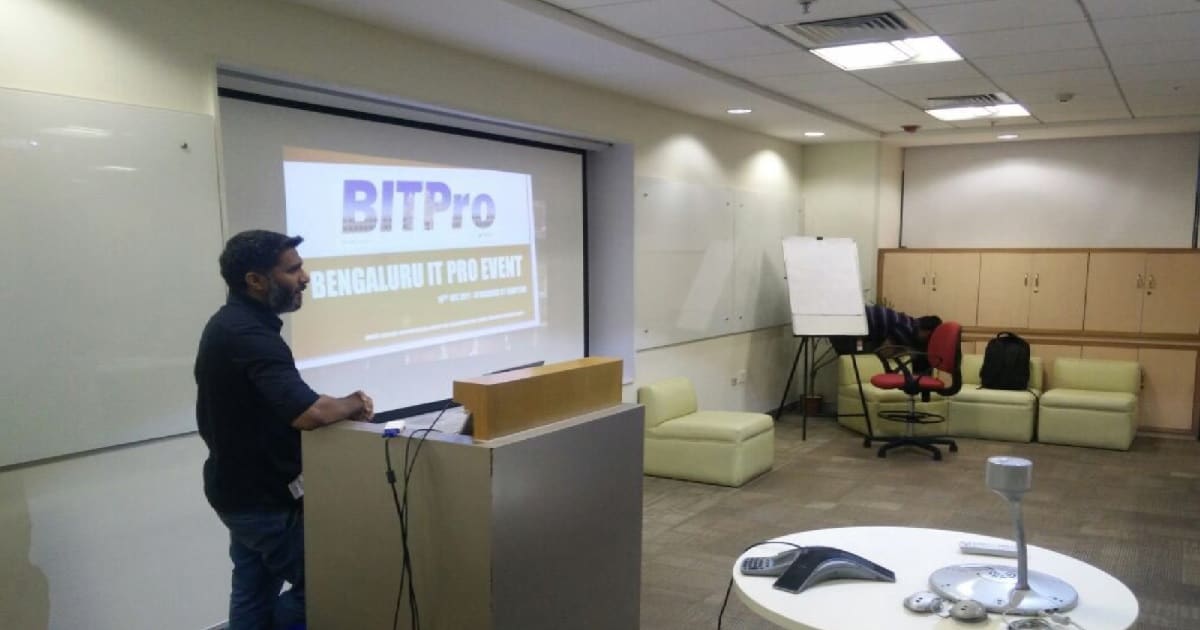
We recently conducted an in-person event for SCCM/Intune professionals all around India. This event was conducted at the Microsoft office in Bangalore. We had more than 80 SCCM professionals from different parts of India, like Chennai, Hyderabad, Delhi, and Bangalore.
I started blogging in 2010, and I have more than 900 posts. 2017 was a very successful year for me in sharing my knowledge through my blog.
SCCM Intune Community Around Me – Fig.1
I started working on video tutorials for almost all the technical posts. How-to video guides are included for Intune, SCCM, and Windows 10. Thank you all for your great support over the years.
I’m working with other IT Pro colleagues to improve the blog experience and provide more valuable content to the SCCM/Intune community. More news about this will be available in 2018. I’m excited about next year for the SCCM/Intune community.
Subscribe to Anoop’s newsletter through the SUBSCRIBE button on the blog. Like the Facebook page to get updated on new posts of AnoopCNair.com. We have loads of SCCM Intune-related videos on the Facebook page below.
We have a great SCCM professional community available on Facebook. We have more than 11,200 members in this SCCM professional Facebook group. If you want to join the SCCM, Intune, and Desktop Facebook community, please enter them with the following links.
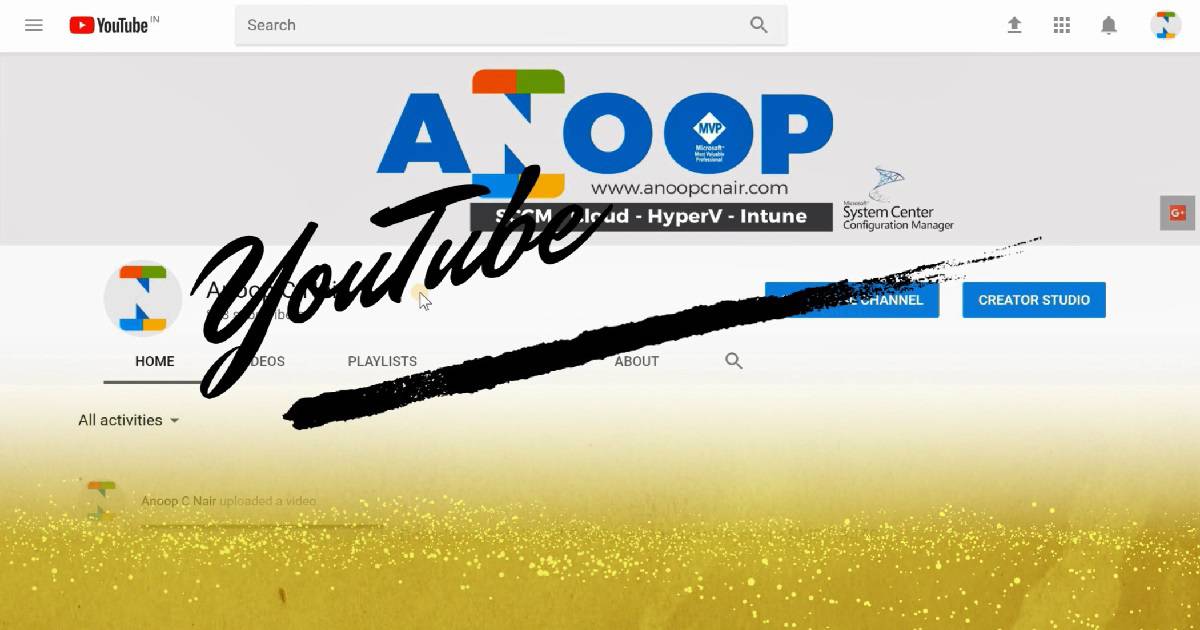
I have a YouTube channel with more than 830 subscribers, 156,360 views, and 160 video tutorials. I started concentrating on my YouTube channel in 2017, and 90% of my subscribers are from 2017. Most of the videos are on SCCM, Intune, and Windows 10.
This is one of my old SCCM LinkedIn groups that started in 2010. At that time, Facebook groups were not there and were famous. Several different SCCM groups on LinkedIn, so I created this one for the Indian SCCM community.
We have more than 1900 members in this group. Some of them are still active. We announce Bangalore IT Pro events in this Indian SCCM Professionals LinkedIn group. This is for the people who don’t like Facebook or consider Facebook as a personal social media site.
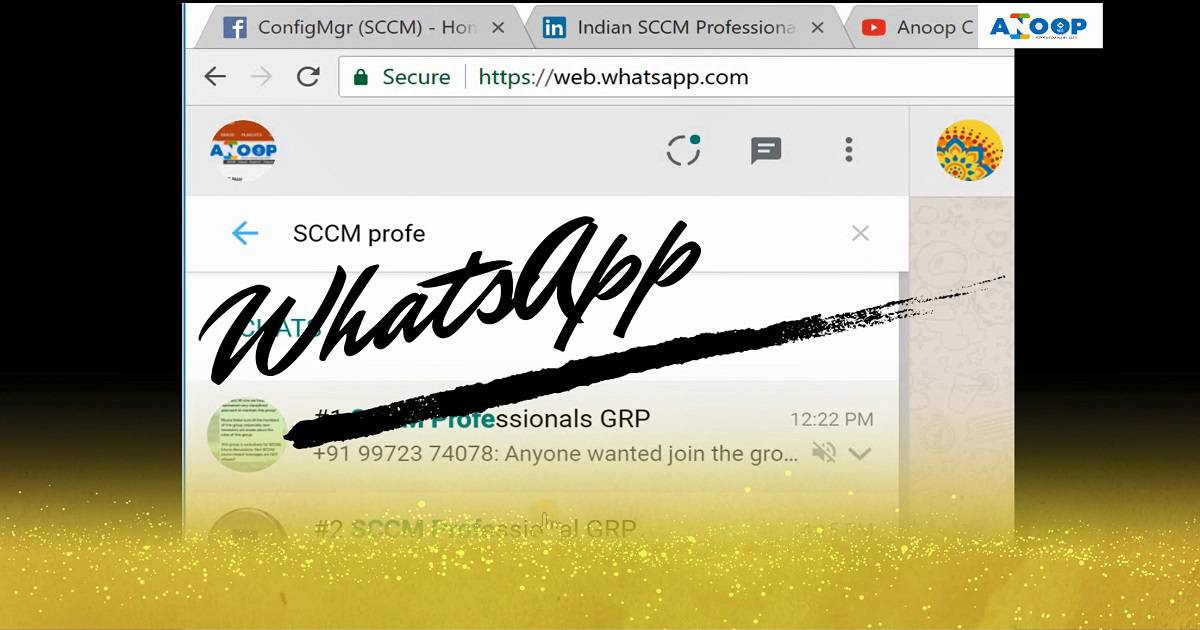
I created a WhatsApp group for SCCM/Intune Professionals back in 2015. This is mainly to avoid people creating different WhatsApp groups in our Facebook SCCM group. I have created an official WhatsApp group for SCCM professionals after many discussions.
We have several admins in that WhatsApp group, and we don’t allow any spam/forwarded messages in that group apart from the Job/Opening of SCCM/Intune professionals. This is to help others get a better opportunity in their SCCM career.
Join #2 SCCM Professional GRP HERE
Happy New Year and Best Wishes for 2018
We already crossed the maximum limit of a WhatsApp group (#1 SCCM Professional GRP – 256 members). After many thoughts, discussions, and market analysis, we decided to create another WhatsApp group (#2 SCCM Professional GRP ), and we already have more than 100 members.
SCCM Intune Community Around Me – Fig.4
We are on WhatsApp now. To get the latest step-by-step guides, news, and updates, Join our Channel. Click here. HTMD WhatsApp.
Author
Anoop C Nair is Microsoft MVP! He is a Device Management Admin with more than 20 years of experience (calculation done in 2021) in IT. He is a Blogger, Speaker, and Local User Group HTMD Community leader. His main focus is on Device Management technologies like SCCM 2012, Current Branch, and Intune. He writes about ConfigMgr, Windows 11, Windows 10, Azure AD, Microsoft Intune, Windows 365, AVD, etc.
Let’s discuss how to Download, Install, and Configure MDT 8450 SCCM Configuration Manager ConfigMgr. I downloaded Microsoft DeploymentToolkit_x64.MSI and installed it on the SCCM CB lab environment. MDT 8450 is available in 32—and 64-bit versions.
This version (build 6.3.8450.1000) of the Microsoft Deployment Toolkit requires a Windows 10 ADK build. This post will show you how to Download, Install, and Configure MDT 8450.
Microsoft Deployment Toolkit (MDT) is formerly Business Desktop Deployment (BDD). MDT is an application that provides network deployment capabilities for Microsoft Windows operating systems.
In this post, you will find all the details on how to Download and Install and Configure MDT 8450 SCCM Configuration Manager ConfigMgr. MDT is a free tool for automating Windows and Windows Server operating system deployment.
If you have an SCCMenvironment, you can integrate SCCM with MDT to provide enhanced features (UDI and ZTI) to your OS deployment process.
The Microsoft Deployment Toolkit (MDT) is a free tool for automating Windows and Windows Server operating system deployment, leveraging the Windows Assessment and Deployment Kit (ADK) for Windows 10.
The following information is copied from the MDT deployment Workbench. The Microsoft Deployment Toolkit (MDT) provides a unified collection of tools, processes, and guidance for automating desktop and server deployments.
In addition to reducing deployment time and standardizing desktop and server images, MDT offers improved security and ongoing configuration management.
MDT supports deploying Windows 10 through Windows 7 and the associated server and embedded operating systems.
Features such as Windows 10 in-place upgrade, flexible driver management, optimized user interface workflow, and Windows PowerShell scripting can simplify deployment and simplify your job. Deploy faster and easier with MDT.
For example, if your organization doesn’t have an SCCM infra to perform OS deployments, you can use MDT.
Following are the supported OS to install the latest version of MDT. It can be installed on the client’s OS versions of Windows. Other Requirements of MDT are Windows ADK for Windows 10, version 1709 or later, which is required for all deployment scenarios.
SCCM version 1710 or later is required for zero-touch installation (ZTI) and user-driven installation (UDI) scenarios.
When using ZTI and/or UDI, you can add the MDT SQL database to any version of SCCM with SQL Technology; if you are using LTI, you must use a separately licensed SQL Server product to host your MDT SQL database.
We are on WhatsApp now. To get the latest step-by-step guides, news, and updates, Join our Channel. Click here. HTMD WhatsApp.
Author
Anoop C Nair is Microsoft MVP! He is a Device Management Admin with more than 20 years of experience (calculation done in 2021) in IT. He is a Blogger, Speaker, and Local User Group HTMD Community leader. His main focus is on Device Management technologies like SCCM 2012, Current Branch, and Intune. He writes about ConfigMgr, Windows 11, Windows 10, Azure AD, Microsoft Intune, Windows 365, AVD, etc.
Microsoft SCCM team released the latest production version 1710 of SCCM/ConfigMgr. The version is published as an opt-in option. This SCCM 1710 production version release won’t show automatically in your SCCM console.
This release is called the Fast Ring production release of SCCM 1710. This post will see “SCCM 1710 New Features Overview Plus Upgrade Guide.”
Before upgrading, it would be interesting to check out the differences between the 1706 and 1710 versions. I have a video post titled “Differences Between SCCM ConfigMgr CB 1710 and 1706.”
SCCM/ConfigMgr CB 1710 production update is applicable only for the SCCM CB 1610 and later. For example, if your SCCM environment is running with the SCCM CB 1606 version, this 1710 version won’t be visible to your environment.
To access the SCCM CB 1710 production version, you need to upgrade from 1606 to 1610. Once you have completed that upgrade and are in the 1610 version of SCCM CB, you can update it to the 1710 version.
Video Tutorial SCCM 1710 New Features Overview Plus Upgrade Guide – Fig.1
How to Get the Opt-in Version of SCCM 1710?
The SCCM 1710 update will be rolled out globally in the coming weeks and will be automatically downloaded. Once this update is rolled out globally, you don’t need to run the PowerShell script. Moreover, when it is ready to install, SCCM admins will be notified from the “Updates and Servicing” node.
Video Tutorial SCCM 1710 New Features Overview Plus Upgrade Guide – Fig.2
New Features of SCCM 1710 Production Version
The SCCM CB 1710 Production version has 7 pre-release features and 20 Release Features. The video tutorial provides more details about the upgrade and new features.
Video Tutorial SCCM 1710 New Features Overview Plus Upgrade Guide – Fig.3
SCCM CB 1710 Software center can have your organization logo and other branding options without an Intune subscription, which is very useful for organizations. To configure these branding options, navigate to client settings, open custom client Policy settings, and click on the software center.
Peer cache is not pre-release feature
Cloud DP supports Azure Govt Cloud
Co-Management
Identify the devices that require a restart and restart using the client notification channel.
Improvements in Run Script option – Security Scope, Real-time monitoring, and parameter
Software Center 250×250 icon
OSD – Parent-Child nested Task Sequence
Software Center – Enterprise Branding
Software Update – Surface Driver Update is no longer a pre-release feature
Telemetry level setting in Client settings
Limited support for Cryptography: Next Generation (CNG) certificates
Exploit Guard policies
Windows Defender Application Guard policy
Device Guard policy changes
Video Tutorial SCCM 1710 New Features Overview Plus Upgrade Guide – Fig.4
SCCM Software Center Branding without Intune subscription
The software center has many more granular options to collect the Windows 10 telemetry data from SCCM client machines. This option is available under the Windows Analytics tab in the SCCM software center.
Video Tutorial SCCM 1710 New Features Overview Plus Upgrade Guide – Fig.5
What is New in SCCM 1710 Scripts Options?
The above two points are improvements in SCCM 1710 script options. You can scope the scripts in and out depending on your requirements.
We are on WhatsApp now. To get the latest step-by-step guides, news, and updates, Join our Channel. Click here. HTMD WhatsApp.
Author
Anoop C Nair is Microsoft MVP! He is a Device Management Admin with more than 20 years of experience (calculation done in 2021) in IT. He is a Blogger, Speaker, and Local User Group HTMD Community leader. His main focus is on Device Management technologies like SCCM 2012, Current Branch, and Intune. He writes about ConfigMgr, Windows 11, Windows 10, Azure AD, Microsoft Intune, Windows 365, AVD, etc.
This post and video tutorial will cover the SCCM CB preview 1711 upgrade and new features. This is not a production version of SCCM CB.
Hence, we are not supposed to install this version in production environments. SCCM CB 1711 is the preview version and should be installed only in a lab environment.
The preview version does not allow us to install CAS and secondary servers, and the prerequisite for installing the SCCM CB 1711 preview version has not changed.
The SCCM CB update and servicing process are the same as before. Once the latest version of the preview is released, the update will be available in the SCCM console.
The SCCM CB preview version is similar to the Windows Insiders program, which helps SCCM admins test the new SCCM CB features. Before installing this technical preview, you can review the limitations of the SCCM CB version.
Configuration Manager SCCM CB Preview 1711 Upgrade New Features ConfigMgr
When all features from a technical preview release are available in the minimum supported version of the current branch details or that preview version is removed from the following table, shown in the screenshot below.
Configuration Manager SCCM CB Preview 1711 Upgrade New Features ConfigMgr – Fig.1
How to Create an SCCM CB Preview Version Lab Environment?
Have you installed an SCCM CB preview version? If not, you can download the latest baseline version of ConfigMgr SCCM CB Technical Preview. One version of the SCCM preview has a maximum validity of only 3 months (90 days).
Configuration Manager SCCM CB Preview 1711 Upgrade New Features ConfigMgr – Fig.2
New Features of SCCM CB 1711 Preview Version
Following are the three highlighted features of the SCCM CB 1711 preview version. But, Ronni has blogged about another exciting feature in his blog post. More details about that “SCCM: Enable Desktop Clients as PXE Servers.”
Improvements to run task sequence step
Allow user interaction when installing an application
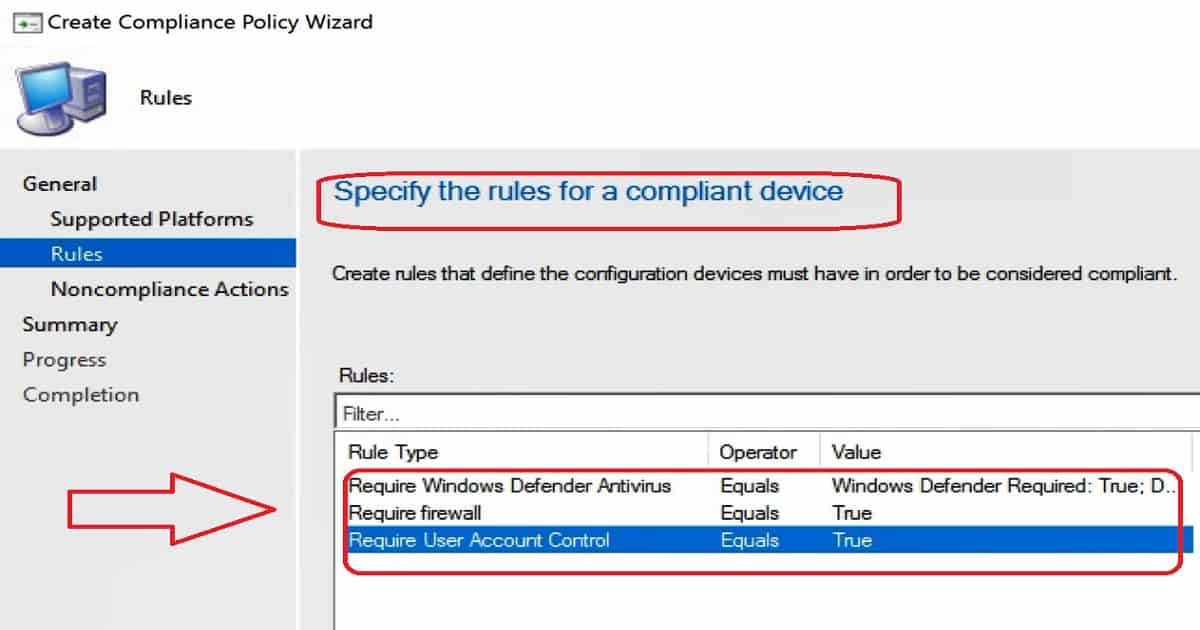
New compliance policies for Windows 10
Nesting of Task Sequence In the task sequence editor, click Add, select General, and click Run Task Sequence. Click Browse to choose the child task sequence.
Allow user interaction when installing an application. You can allow an end-user to interact with an application installation while running the task sequence.
During the task sequence progress, the application installation interface appears on the target end-user device. The task sequence progress pauses until the end-user completes the application installation workflow.
New compliance policy options for Windows 10: You can check whether the Firewall software is enabled on Windows 10 machines. If not enabled, you can block access to company resources. You can also check whether UAC is enabled on Windows machines.
If not enabled, you can block access to company resources. Defender verification is also possible via Windows 10 compliance policies through the SCCM console.
We are on WhatsApp now. To get the latest step-by-step guides, news, and updates, Join our Channel. Click here. HTMD WhatsApp.
Author
Anoop C Nair is Microsoft MVP! He is a Device Management Admin with more than 20 years of experience (calculation done in 2021) in IT. He is a Blogger, Speaker, and Local User Group HTMD Community leader. His main focus is on Device Management technologies like SCCM 2012, Current Branch, and Intune. He writes about ConfigMgr, Windows 11, Windows 10, Azure AD, Microsoft Intune, Windows 365, AVD, etc.
Let’s learn how to set up SCCM Azure AD User Discovery ConfigMgr. The Azure Active Directory user discovery feature was added to SCCM in 1706 and later versions.
Azure AD user discovery helps deploy applications to Azure AD users. It enables the deployment of apps to AAD users in a co-management scenario.
Azure AD User Discovery can be configured from the Administration workspace – Cloud Management. This post will see “Video Tutorial on How to Setup SCCM Azure AD User Discovery.”
SCCM Azure AD user discovery involves discovering specific users from Azure AD. The details of these users will be stored in SCCM DB.
How to Setup SCCM Azure AD User Discovery ConfigMgr – Video 1
What is SCCM Azure AD User Discovery?
This provides deeper visibility of Azure AD user properties, which SCCM could use to target Azure AD users’ applications.
Where are Azure AD User Discovery Configurations?
In the SCCM console, navigate through Administration- Cloud Services – Azure Services – Cloud Management. You don’t have to use the Azure portal to create server and client applications.
Instead, the following SCCM Azure service Wizard helps create apps in Azure and schedule the Azure AD User Discovery configurations.
How to Setup SCCM Azure AD User Discovery ConfigMgr – Fig.1
How Do You Create Azure Server and Client Apps from the SCCM Console?
As part of the Azure AD user discovery process, we must create connectivity between the on-prem SCCM CB server and Azure AD. This is done through Azure server-side and client-side applications (more details in the section below). We can create these apps using the Azure Services Wizard in the SCCM console.
We need to create Azure Apps using Azure AD admin credentials. Once successfully authenticatedwith Azure AD, SCCM helps you create the two apps mentioned in the screenshot below.
Creating applications is straightforward, as seen in the video tutorial. Enter the Application Name, Home Page URL, and APP ID URI—any URL is OK. You don’t want a proper working URL; any URL will be OK. The secret critical Validity period is one year, and the Azure AD admin account signs in.
Azure AD tenant names will automatically populate when you authenticate with Azure AD. It would help to have an internet connection on the SCCM console’s server.
How Do You Configure Azure AD User Discovery Settings?
Unlike SCCM Active Directory discovery, configuring SCCM Azure AD user discovery does not allow you to select a particular OU. Instead, the discovery runs for the entire tenant.
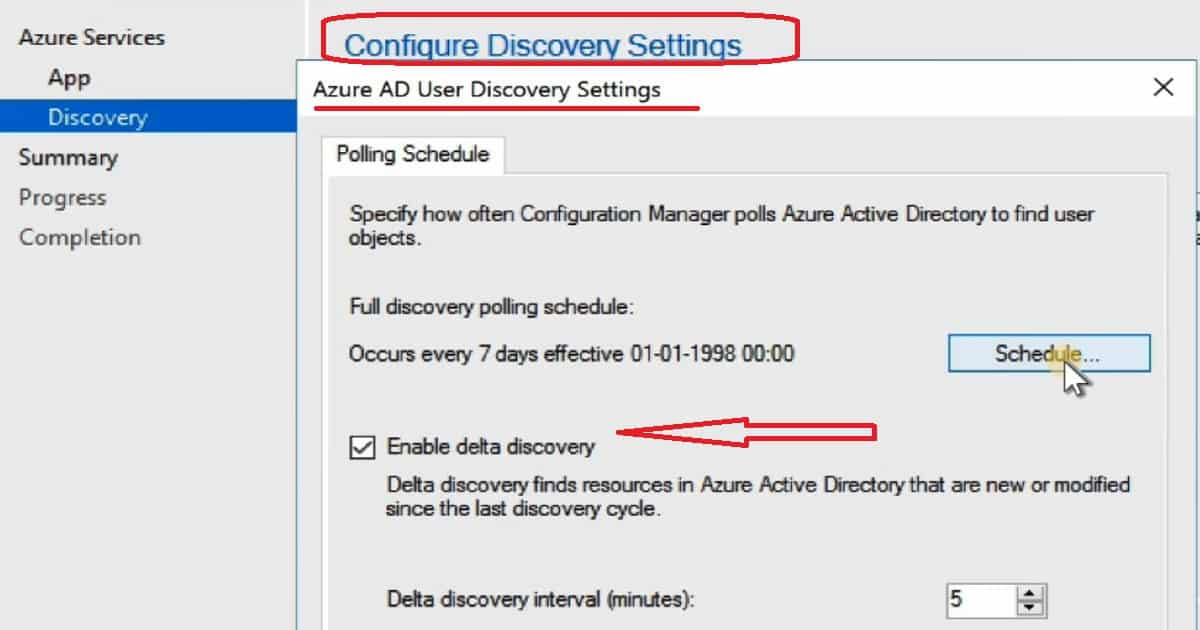
The Azure Services Wizard offers the option to Enable Azure AD discovery settings. Configure the settings to discover resources in Azure AD. When the resources are discovered, SCCM CB creates records in its Database. The SCCM Azure AD user discovery Schedule has two options.
The default settings for complete Azure AD user discovery occur every 7 days. The delta discovery interval is 5 minutes. Delta discovery finds resources in Azure AD that have been new or modified since the last discovery cycle.
Full Azure AD User Discovery
Delta Azure AD User Discovery
Permission Required for SCCM Azure AD User Discovery
We have created two Azure apps (Server and Client) in the Azure App Registration blade. Select the server application and client application – click on Settings and select the Required Permission button.
Click on Grant Permissions to provide SCCM access to discover the Azure AD users. Repeat the same steps for the Client application.
How to Setup SCCM Azure AD User Discovery ConfigMgr – Fig.2
Troubleshooting – SCCM Azure AD User Discovery – Issues
SMS_AZUREAD_DISCOVERY_AGENT.log is where you can trace the details of Azure AD User Discovery.
Full Azure AD User Discovery Sync – Details
Full discovery sync details of Azure AD user discovery are recorded in the log file called SMS_AZUREAD_DISCOVERY_AGENT.log.
Initializing Task Execution Manager instance as SMS_AZUREAD_DISCOVERY_AGENT. $<SMS_AZUREAD_DISCOVERY_AGENT><11-13-2017 10:24:22.056-330><thread=4184 (0x1058)>
Starting component SMS_AZUREAD_DISCOVERY_AGENT~~ $<SMS_AZUREAD_DISCOVERY_AGENT><11-13-2017 10:24:22.165-330><thread=4184 (0x1058)>
Component SMS_AZUREAD_DISCOVERY_AGENT started successfully.~~ $<SMS_AZUREAD_DISCOVERY_AGENT><11-13-2017 10:24:22.712-330><thread=4184 (0x1058)>
Azure AD Discovery Worker starts.~~ $<SMS_AZUREAD_DISCOVERY_AGENT><11-13-2017 10:24:27.353-330><thread=4204 (0x106C)>
Subscribing to Registry Hive: LocalMachine, KeyPath: SOFTWARE\Microsoft\SMS\COMPONENTS\SMS_AZUREAD_DISCOVERY_AGENT, FilterType: ValueChange, WatchSubTree: False~~ $<SMS_AZUREAD_DISCOVERY_AGENT><11-13-2017 10:24:27.369-330><thread=4204 (0x106C)>
Registry Watcher started~~ $<SMS_AZUREAD_DISCOVERY_AGENT><11-13-2017 10:24:27.385-330><thread=4204 (0x106C)>
Successfully subscribed listener to registry key.~~ $<SMS_AZUREAD_DISCOVERY_AGENT><11-13-2017 10:24:27.385-330><thread=4204 (0x106C)>
AAD sync manager for cloud service ID=16777217 started. ~~ $<SMS_AZUREAD_DISCOVERY_AGENT><11-13-2017 10:24:44.541-330><thread=4204 (0x106C)>
Full sync for cloud service ID=16777217 will start immediately. ~~ $<SMS_AZUREAD_DISCOVERY_AGENT><11-13-2017 10:24:44.604-330><thread=4204 (0x106C)>
Graph API version changed to 1.6~~ $<SMS_AZUREAD_DISCOVERY_AGENT><11-13-2017 10:24:45.510-330><thread=4204 (0x106C)>
Query batch size changed to 100~~ $<SMS_AZUREAD_DISCOVERY_AGENT><11-13-2017 10:24:45.526-330><thread=4204 (0x106C)>
Max Json length changed to 33554432~~ $<SMS_AZUREAD_DISCOVERY_AGENT><11-13-2017 10:24:45.572-330><thread=4204 (0x106C)>
AAD full sync initialized for tenant 67bb8c6d-7266-4faa-a290-5edd572c2210, with server app 7f81b297-e94e-4767-b44a-b0a191f32989.~~ $<SMS_AZUREAD_DISCOVERY_AGENT><11-13-2017 10:24:46.416-330><thread=4204 (0x106C)>
ERROR: Sync request failed. Error: Microsoft.IdentityModel.Clients.ActiveDirectory.AdalServiceException: Service returned error. Check
Delta Azure AD User Discovery sync – Details
Let’s find out more details from the log files SMS_AZUREAD_DISCOVERY_AGENT.log.
INFO: UDX was written for user TESTSyc@anoopc.onmicrosoft.com - C:\Program Files\Microsoft Configuration Manager\inboxes\auth\ddm.box\userddrsonly\___mrxm4stp.UDX at 06-11-2017 16:10:11.~~ $<SMS_AZUREAD_DISCOVERY_AGENT><11-06-2017 16:10:11.412-330><thread=2552 (0x9F8)>
Successfully published UDX for Azure Active Directory users.~~ $<SMS_AZUREAD_DISCOVERY_AGENT><11-06-2017 16:10:11.453-330><thread=2552 (0x9F8)>
Total AAD Users Found: 1. Total AAD User Record Created: 1~~ $<SMS_AZUREAD_DISCOVERY_AGENT><11-06-2017 16:10:11.536-330><thread=2552 (0x9F8)>
AAD delta sync completed successfully at 16:10:11. ~~ $<SMS_AZUREAD_DISCOVERY_AGENT><11-06-2017 16:10:11.612-330><thread=2552 (0x9F8)>
Next DELTA sync for cloud service 16777217 will start at 11/06/2017 16:15:11.~~ $<SMS_AZUREAD_DISCOVERY_AGENT><11-06-2017 16:10:11.665-330><thread=2552 (0x9F8)>
AAD delta sync initialized for tenant 67bb8c6d-7266-4faa-a290-5edd572c2210, with server app 7f81b297-e94e-4767-b44a-b0a191f32989.~~ $<SMS_AZUREAD_DISCOVERY_AGENT><11-06-2017 16:15:11.763-330><thread=2552 (0x9F8)>
Successfully acquired access token for server app. ~~ $<SMS_AZUREAD_DISCOVERY_AGENT><11-06-2017 16:15:11.866-330><thread=2552 (0x9F8)>
We are on WhatsApp now. To get the latest step-by-step guides, news, and updates, Join our Channel. Click here. HTMD WhatsApp.
Author
Anoop C Nair is Microsoft MVP! He is a Device Management Admin with more than 20 years of experience (calculation done in 2021) in IT. He is a Blogger, Speaker, and Local User Group HTMD Community leader. His main focus is on Device Management technologies like SCCM 2012, Current Branch, and Intune. He writes about ConfigMgr, Windows 11, Windows 10, Azure AD, Microsoft Intune, Windows 365, AVD, etc.
25 Years ConfigMgr Special Microsoft MVP Summit at Redmond SCCM Configuration Manager. It’s a great experience to work with the Microsoft SCCM product group and fellow MVPs to brainstorm and enhance SCCM/ConfigMgr. Microsoft MVP Summit 2017 is special for SCCM MVPs because ConfigMgr reached its 25th anniversary.
SMS’s (the previous version of SCCM) device management journey started in 1992. This post will give us more details about the “25 Years ConfigMgr and Special Microsoft MVP Summit at Redmond.”
I started working with SMS 2003 back in 2005, which was the early stages of my IT career. I enjoyed my career as an SCCM admin, which changed my life.
SCCM has evolved over the years, and so has my career. I switched cities and jobs, but not the product I love.
25 Years ConfigMgr Special Microsoft MVP Summit at Redmond SCCM Configuration Manager
It’s a great experience working very closely with the SCCM product group (developers) and understanding their side of the story. The SCCM product team is developing new, exciting features and getting ready for the next SCCM CB preview release. Loads of innovations are also planned for the SCCM CB 1802 release.
25 Years ConfigMgr Special Microsoft MVP Summit at Redmond SCCM Configuration Manager – Fig.1
This is my third trip to Redmond, and it’s always exciting to learn more about the insides of SCCM products. It was also great to participate in brainstorming sessions with the SCCM product group. The SCCM product team is always ready to listen to MVPs’ real-world challenges and provide solutions for those challenges.
We are on WhatsApp now. To get the latest step-by-step guides, news, and updates, Join our Channel. Click here. HTMD WhatsApp.
Author
Anoop C Nair is Microsoft MVP! He is a Device Management Admin with more than 20 years of experience (calculation done in 2021) in IT. He is a Blogger, Speaker, and Local User Group HTMD Community leader. His main focus is on Device Management technologies like SCCM 2012, Current Branch, and Intune. He writes a
Windows 10 Upgrade Using SCCM Task Sequence. In the previous post, I explained how to Create a Windows 10 1709 Upgrade Task Sequence in SCCM CB.
I didn’t provide details about distributing the Windows 10 1709 content to DPs, Deploying the Task Sequence, or describing the end-user experience of this type of upgrade.
In this post, we will experience the Windows 10 1709 upgrade using the SCCM Task Sequence in video form. The SCCM admin should ensure that the Windows 10 1709 upgrade package is distributed to all the required DPs and that all the contents referenced in the task sequence are replicated to DPs.
We can start the content distribution from the Windows 10 1709 upgrade task sequence. Right-click on the Task Sequence and click on Distribute Content. This action will initiate the content distribution of all the pending packages.
Learn How to Windows 10 1709 Upgrade Using SCCM Task Sequence– Windows 10 Upgrade Using SCCM Task Sequence
Ensure all the referenced packages in the task sequence are successfully replicated to your DPs. Otherwise, the Windows 10 1709 upgrade will fail.
Windows 10 Upgrade Using SCCM Task Sequence – Video 1
SCCM CB Server Side Preparation for Windows 10 1709 Upgrade – Distribute Required Contents to DPs
Once the content of all the required applications, packages, and OS upgrade packages have been replicated to DPs, then we can create a deployment. The Task Sequence should be deployed to your environment’s required Windows 10 machines.
Windows 10 Upgrade Using SCCM Task Sequence – Fig.1
Deploy the Task Sequence to Windows 10 1703 Machines
But, don’t deploy the Windows 10 upgrade task sequence to all the Windows 10 1703 machines. The upgrade should be a phase-wise approach. Initially, we should deploy this upgrade task sequence to a couple of Windows 10 machines.
Once those two deployments are successful, we can deploy the task sequence to the next set of test devices. In my opinion, we should start the Windows 10 upgrade deployment as “Available.” The optional task sequence empowers users to upgrade their machines to 1709 whenever they want to.
Windows 10 Upgrade Using SCCM Task Sequence – Fig.2
Windows 10 Client-Side Experience of Upgrade Process
Windows 10 1709 upgrade task sequence will be available in the Software Center. We have created the Windows 10 1709 upgrade task sequence as an optional deployment.
The user must open the Software Center and start the upgrade process. As the video shows, this can be done by clicking on the “Install” button.
Windows 10 Client-Side Experience of Upgrade Process
Software Center
Operating Systems
Windows 10 Enterprise Upgrade
Windows 10 Upgrade Using SCCM Task Sequence – Table 1
Windows 10 Upgrade Using SCCM Task Sequence – Fig.3
All the task sequence steps explained in my previous post are performed as part of the Windows 10 1709 upgrade. The SCCM Windows 10 1709 Upgrade Task Sequence provides more details about the steps.
Windows 10 Upgrade Using SCCM Task Sequence – Fig.4
We are on WhatsApp now. To get the latest step-by-step guides, news, and updates, Join our Channel. Click here. HTMD WhatsApp.
Author
Anoop C Nair is Microsoft MVP! He is a Device Management Admin with more than 20 years of experience (calculation done in 2021) in IT. He is a Blogger, Speaker, and Local User Group HTMD Community leader. His main focus is on Device Management technologies like SCCM 2012, Current Branch, and Intune. He writes about ConfigMgr, Windows 11, Windows 10, Azure AD, Microsoft Intune, Windows 365, AVD, etc.
Let’s try to fix the SCCM Update Download Issue using the Update Reset Tool. Have you faced the SCCM CB update getting stuck in the “Downloading” state?
I have seen SCCM CB updates get stuck in the downloading stage. However, in most scenarios, a service restart resolves this issue. This post will see “CM Update Reset Tool Fixes SCCM CB Update Download Issue.”
The other issue I encountered was that the REDIST prerequisite files were not getting downloaded. I could see errors related to the REDIST file download in the ConfigMgrSetup.log. I was getting the error: I failed to download Redist, as discussed in the following section of the post.
Beginning with version 1706, SCCM primary sites and CAS include the Configuration Manager Update Reset Tool and CMUpdateReset.exe. The tool is used to fix issues when in-console updates have problems downloading or replicating. The device is found in the \cd.latest\SMSSETUP\TOOLS folder of the site server.
Issue Statement – SCCM CB Update Stuck in Downloading State– FIX SCCM Update Download Issue with Update Reset Tool
Let’s check the Issue Statement here. The SCCM CB Update is Stuck in Downloading state, and I’m trying to find a solution to fix the issue.
I checked the size of the folder C:\Program Files\Microsoft Configuration Manager\EasySetupPayload. And the size was over 1 GB. I tried to restart the SMS Executive service a couple of times without any luck.
DMPDownloader.log
Let’s quickly check the log files to understand the FIX SCCM Update Download Issue.
ERROR: HasIntuneSubscription has failed to run query fn_HasIntuneSubscription with following exception : System.Data.SqlClient.SqlException (0x80131904): Connection Timeout Expired. The timeout period elapsed while attempting to consume the pre-login handshake acknowledgement. This could be because the pre-login handshake failed or the server was unable to respond back in time. The duration spent while attempting to connect to this server was – [Pre-Login] initialization=4997; handshake=15872; —> System.ComponentModel.Win32Exception (0x80004005): The wait operation timed out~~ at System.Data.SqlClient.SqlInternalConnectionTds..ctor(DbConnectionPoolIdentity identity ERROR: Failed to download redist for c410f586-cf7a-4279-b963-139606fc25be with command /RedistUrl http://go.microsoft.com/fwlink/?LinkID=855656 /LnManifestUrl http://go.microsoft.com/fwlink/?LinkID=855641 /RedistVersion 201710 /NoUI “\\SCCMTP1.INTUNE.COM\EasySetupPayload\c410f586-cf7a-4279-b963-139606fc25be\redist”
What is a CMUpdateReset.exe Tool?CM Update Reset Tool
CMUpdateReset.exe is the Configuration Manager Update and Reset Tool. Microsoft provides this free tool for SCCM customers. It is part of the CD’s Latest folder and Tools folder.
The CM Update Reset Tool is a command-line tool that should be run from the topmost server in the SCCM hierarchy. This tool helps SCCM admins fix issues when SCCM CB in-console updates have problems downloading or replicating.
The CM Update Reset tool is in the following folder \cd.latest\SMSSETUP\TOOLS. We should run this tool from CAS or a standalone primary SQL server. More details Video Tutorial to Fix SCCM CB updates stuck in Downloading.
FIX SCCM Update Download Issue with Update Reset Tool – Video 1
Prerequisites – FIX SCCM Update Download Issue with CM Update Reset Tool
The account you use to run the tool (CM Update Reset Tool) requires the following permissions:
Read and Write permissions to the site database of the central administration site and each primary site in your hierarchy. To set these permissions, you can add the user account as a member of the db_datawriter and db_datareaderfixed database roles on the Configuration Manager database of each site. The tool does not interact with secondary sites.
Local Administrator on the top-level site of your hierarchy.
Local Administrator on the computer that hosts the service connection point.
The tool (CM Update Reset Tool) must be run on the top-level site of the hierarchy. When you run the tool, use command-line parameters to specify.
CM Update Reset Tool
The SQL Server is at the top-tier site of the hierarchy.
From where can you run this Configuration Manager Update, Reset Tool?
CAS/SQL server
standalone primary/SQL server
The SCCM download reset tool (CMUpdateReset.exe) must be run on the hierarchy’s top-level site (CAS or standalone primary). When you run the tool, use the CM Update Reset tool command-line parameters to specify:
The CAS/Primary SQL Server at the top-tier site of the hierarchy
The CAS/Primary site database name at the top-tier site
The GUID of the update package you want to reset
What are the SCCM Update Reset Options?
There are two options to fix SCCM Updates and Servicing Issues using the CMUpdateReset.exe tool.
Reset an update and restart the download
Force deletion of the problematic update package
What is the Use Case for the CM Update Reset Tool?
Let’s understand the scenarios in which you must use the CM Update Reset Tool to fix the SCCM Update Download issue.
The update has been stuck in a downloading state for more than an hour
The update is stuck, and the EasySetupPayload folder size is not increasing at all
Update package replication to SCCM child primary sites are stuck for a long time
Update package replication to the child primary server has failed
If you want to reset an update with download problems, you can run the following command from the topmost SQL server.
In the background, the tool will reset some SQL table entries to remove the update entry from the console. But this action won’t delete the folders and files in C:\Program Files\Microsoft Configuration Manager\ EasySetupPayload.
The above command didn’t resolve my issue in the scenario explained in this post. When I ran the command, the update of SCCM CB 1710 was removed from the SCCM console. I restarted the SMS Executive service, and the update appeared again in the console. However, it was again stuck in the downloading stage.
SCCM Update Reset Force Delete Option
Once the above command line doesn’t resolve the download or replication issue, we must force delete the updates. This is an extreme scenario; you want to force the deletion of the problematic update package.
High-Level Process of CMUpdateReset.EXE -FDELETE
Let’s discuss the High-Level Process of CMUpdateReset.EXE -FDELETE. The list below helps you to show it.
Add all activities stored in the CM_UpdatePackageSiteStatus_HIST table
Delete the Package distribution list for update package
Delete the update package from the EasySetupSettings table
Delete the update package from the cm_updatepackageSiteStatus table
Delete the update package from the CM_UpdatePackage_MonitoringStatus table
Delete update package from cm_updatepackages table
Verify the table entries for the package are deleted from CM_UpdatePackage_MonitoringStatus
Delete the CAB files from \SCCMTP1.Intune.com\sms_TP1\EasySetupPayLoad\ folder
Delete the folders from \\SCCMTP1.Intune.com\sms_TP1\EasySetupPayLoad\ folder
Another Example – In a typical scenario, you want to reset an update with download problems. Your SQL Servers FQDN is server1.htmd.com; the site database is CM_MEM and the package GUID is 61F16B3C-F1F6-4F9F-8647-2A524B0C802C. You run: CMUpdateReset.exe -S server1.htmd.com -D CM_MEM -P 61F16B3C-F1F6-4F9F-8647-2A524B0C802C
Results of Command Line
FIX SCCM Update Download Issue with Update Reset Tool results are given below.
C:\Program Files\Microsoft Configuration Manager\cd.latest\SMSSETUP\TOOLS\CMUpdateReset>CMUpdateReset.exe -FDELETE -S SCCMTP1.Intune.com -D CM_TP1 -P c410f586-cf7a-4279-b963-139606fc25be
[Warning]
You can use this tool when an in-console update has not yet installed and is in a failed state. A failed state can mean the update download remains in progress but is stuck and taking an excessively long time, perhaps hours longer than your historical expectations for update packages of similar size. It can also be a failure to replicate the update to child primary sites. When you run the tool, it runs against the update that you specify. If the package is in pre-installation state, it will delete it. If package is in replicating state, it will reinitiate replication. Are you sure you want to run the tool? Enter Y for Yes and N for No.
Y
Running CMUpdateReset.exe tool ...
Verified that the SQL server FQDN belongs to the top level site.
Verified that the site servers run version 1606 or later.
Verified that replication is active.
Package is in pre-installation state. Attempting to clean up the package.
Verified that the service connection point is installed on the top level site.
Verified that the account has permission to service connection point share.
Verified that the account has permission to the inboxes\hman.box folder.
Service SMS_EXECUTIVE is Running on machine SCCMTP1.Intune.com.
Verified that service SMS_EXECUTIVE is running on machine SCCMTP1.Intune.com.
Service CONFIGURATION_MANAGER_UPDATE is Running on machine SCCMTP1.Intune.com.
Verified that service CONFIGURATION_MANAGER_UPDATE is running on machine SCCMTP1.Intune.com.
Verified that the package is not in post-replication state for all the child sites (if any).
Marking package in the package distribution list as deleted.
(0 row(s) affected.)
Adding entry in CM_UpdatePackageSiteStatus_HIST for history tracking.
(1 row(s) affected.)
Marked package in the package distribution list as deleted.
Deleting update package c410f586-cf7a-4279-b963-139606fc25be from EasySetupSettings table on site server SCCMTP1.Intune.com.
(0 row(s) affected.)
Adding entry in CM_UpdatePackageSiteStatus_HIST for history tracking.
(1 row(s) affected.)
Update package is deleted from EasySetupSettings table.
Deleting update package c410f586-cf7a-4279-b963-139606fc25be from cm_updatepackageSiteStatus table on site server SCCMTP1.Intune.com.
(0 row(s) affected.)
Adding entry in CM_UpdatePackageSiteStatus_HIST for history tracking.
(1 row(s) affected.)
Update package is deleted from cm_updatepackageSiteStatus table.
Deleting update package c410f586-cf7a-4279-b963-139606fc25be from CM_UpdatePackage_MonitoringStatus table on site server SCCMTP1.Intune.com.
(0 row(s) affected.)
Adding entry in CM_UpdatePackageSiteStatus_HIST for history tracking.
(1 row(s) affected.)
Update package is deleted from cm_updatepackageSiteStatus table.
Deleting update package c410f586-cf7a-4279-b963-139606fc25be from cm_updatepackages table on site server SCCMTP1.Intune.com.
(1 row(s) affected.)
Adding entry in CM_UpdatePackageSiteStatus_HIST for history tracking.
(1 row(s) affected.)
Update package is deleted from CM_UpdatePackage_MonitoringStatus table.
Verifying whether the table entries for package c410f586-cf7a-4279-b963-139606fc25be is deleted on site server SCCMTP1.Intune.com.
Adding entry in CM_UpdatePackageSiteStatus_HIST for history tracking.
(1 row(s) affected.)
Deleting \\SCCMTP1.Intune.com\sms_TP1\EasySetupPayLoad\c410f586-cf7a-4279-b963-139606fc25be.cab.
Deleted \\SCCMTP1.Intune.com\sms_TP1\EasySetupPayLoad\c410f586-cf7a-4279-b963-139606fc25be.cab.
Adding entry in CM_UpdatePackageSiteStatus_HIST for history tracking.
(1 row(s) affected.)
Deleting \\SCCMTP1.Intune.com\sms_TP1\EasySetupPayLoad\Offline\c410f586-cf7a-4279-b963-139606fc25be.cab.
\\SCCMTP1.Intune.com\sms_TP1\EasySetupPayLoad\Offline\c410f586-cf7a-4279-b963-139606fc25be.cab does not exist to delete.
Deleting \\SCCMTP1.Intune.com\sms_TP1\EasySetupPayLoad\Offline\ConfigMgr.Update.Manifest.cab
\\SCCMTP1.Intune.com\sms_TP1\EasySetupPayLoad\Offline\ConfigMgr.Update.Manifest.cab does not exist to delete.
Adding entry in CM_UpdatePackageSiteStatus_HIST for history tracking.
(1 row(s) affected.)
Deleting \\SCCMTP1.Intune.com\sms_TP1\EasySetupPayLoad\c410f586-cf7a-4279-b963-139606fc25be.
Deleted \\SCCMTP1.Intune.com\sms_TP1\EasySetupPayLoad\c410f586-cf7a-4279-b963-139606fc25be.
Adding entry in CM_UpdatePackageSiteStatus_HIST for history tracking.
(1 row(s) affected.)
Deleting cmupdate notifications.
Adding entry in CM_UpdatePackageSiteStatus_HIST for history tracking.
(1 row(s) affected.)
[Success]Successfully ran the CMUpdateReset.exe tool. If the tool deleted the package (check Updates and Servicing to see if the package is listed), you must restart the SMS_EXECUTIVE service on the top level site. Or, use Check for Update in console to redownload the package.
If the package is reinitiating replication or installation, DO NOT restart the SMS_EXECUTIVE service. You can use the flowchart at (https://docs.microsoft.com/sccm/core/servers/manage/update-replication-flowchart) to troubleshoot additional issues..
Success – SCCM CB Update Downloaded
After running the tool, I restarted the SMS Executive service. The updated entry for SCCM 1710 has been created and is ready in the “Available to Download” state. I started the download, and it finished downloading the update. Now, the update state is “Ready to Install.”
Log Entries of Successful Completion of SCCM CB Update Download
Let’s discuss the Log Entries of Successful Completion of SCCM CB Update Download.
EasySetupDownloadSinglePackage finishes downloading c410f586-cf7a-4279-b963-139606fc25be.
Successfully Dropped the state message 13
Generating state message: 13 for package c410f586-cf7a-4279-b963-139606fc25be
Generating state message: 13 for package c410f586-cf7a-4279-b963-139606fc25be~~ $<SMS_DMP_DOWNLOADER><11-05-2017 11:40:30.480-330><thread=5984 (0x1760)>
Write the state message in C:\Program Files\Microsoft Configuration Manager\inboxes\auth\statesys.box\incoming\high\___CMUvx2u44jq.SMX~~ $<SMS_DMP_DOWNLOADER><11-05-2017 11:40:30.500-330><thread=5984 (0x1760)>
Successfully Dropped the state message 13~~ $<SMS_DMP_DOWNLOADER><11-05-2017 11:40:30.533-330><thread=5984 (0x1760)>
EasySetupDownloadSinglePackage finishes downloading c410f586-cf7a-4279-b963-139606fc25be. ~~ $<SMS_DMP_DOWNLOADER><11-05-2017 11:40:30.557-330><thread=5984 (0x1760)>
Get Easy Setup installed Packages to delete payload~~ $<SMS_DMP_DOWNLOADER><11-05-2017 11:40:30.577-330><thread=5984 (0x1760)>
SCCM Update Download Issues Not Fixed by CM Update Reset Tool?
What if the CM Update Reset Tool doesn’t fix SCCM Update Download Issues? The following are the steps to download SCCM updates. If the command-line tool CMUpdateReset.exe doesn’t help fix it, what next?
You can check this download status from the SCCM monitoring workspace. More details are in the log file ConfigMgrSetup.log.
Process update package
Download the updated package cab file
Extract update package payload
Download redist
Report package as downloaded
FIX SCCM CB Download Stuck at REDIST Prerequisite Files
In my scenario, REDIST prerequisite files were not getting downloaded. I could see errors related to the REDIST file download in the ConfigMgrSetup.log. If you have problems downloading redist files, then ConfigMgrSetup.log is the best place to get to the root of the issue.
Once the prerequisite files are downloaded then, copy those files to D:\Program Files \Microsoft Configuration Manager\EasySetupPayload\<Update PackageGUID >\Redist folder.
I don’t recommend doing this in your production environment. Thanks to Robert Marshall’s tip, which helped me to resolve the issue. I have mentioned this in the tweet.
The above section of the post “CMUpdateReset.exe Tool Fixes SCCM CB Update Download Issue” has more details. But it didn’t work for me this time. I was getting the following error in the DMPDownloader.log.
I struggle to download the SCCM CB version in my test lab. I have gone through my previous posts to fix the download issue.
ERROR: Failed to download redist for 51d629d3-c355-4b80-ad6f-ba44b27f84ed with command /RedistUrl http://go.microsoft.com/fwlink/?LinkID=860262 /LnManifestUrl http://go.microsoft.com/fwlink/?LinkID=860266 /RedistVersion 201712 /NoUI “\SCCMTP1.INTUNE.COM\EasySetupPayload\51d629d3-c355-4b80-ad6f-ba44b27f84ed\redist”
Failed to download redist for 51d629d3-c355-4b80-ad6f-ba44b27f84ed.
I could see the actual download of the SCCM update had happened on the following path “D:\Program Files\Microsoft Configuration Manager\EasySetupPayload“.
But the status does not change from Downloading to Ready to Install. The fix for the SCCM Redist download issue has been explained below.
We are on WhatsApp now. To get the latest step-by-step guides, news, and updates, Join our Channel. Click here. HTMD WhatsApp.
Author
Anoop C Nair is Microsoft MVP! He is a Device Management Admin with more than 20 years of experience (calculation done in 2021) in IT. He is a Blogger, Speaker, and Local User Group HTMD Community leader. His main focus is on Device Management technologies like SCCM 2012, Current Branch, and Intune. He writes about ConfigMgr, Windows 11, Windows 10, Azure AD, Microsoft Intune, Windows 365, AVD, etc.
Let’s discuss the SCCM Run Script Results Configuration Manager ConfigMgr Real-Time Graphical Representation. The most exciting feature introduced in the SCCM 1710 version is the real-time graphical representation of RUN SCRIPTS results. This post explains SCCM-run script deployments.
The SCCM Run Script option uses a fast-channel method to get script results from end-user devices. The SCCM CB version can get script results from end-user machines in almost real-time.
This feature’s added advantage is that the results can be graphically represented quickly. The SCCM team enabled this feature out of the box for the SCCM CB version.
Real-Time Graphical Representation of SCCM Run Script Results
Real-Time Graphical Representation of SCCM Run Script. The SCCM CB 1710 Preview version was released a couple of weeks back. The most exciting feature introduced in the SCCM 1710 version is the real-time graphical representation of RUN SCRIPTS.
SCCM Run Script Results Configuration Manager ConfigMgr Real-Time Graphical Representation – Video 1
What is a Real-Time Graphical Representation of SCCM Run Script?SCCM Run Script Results
The SCCM product team added the ability to configure security scopes for the Run Scripts feature. This is an exciting option, as most corporate organizations don’t want their SCCM admins to push PowerShell scripts to all the machines. Also, this is almost real-time script deployment through the fast-channel push method.
Do you want to know more about the fast-channel push notification method? I have a post that explains this: “Video SCCM CB Run PowerShell Script via Fast Channel PUSH Notification.” The monitoring improvement of “Run Scripts” is an excellent feature of SCCM CB 1710. The Run Scripts wizard includes a graphical representation of results.
Another option to get the graphical representation of Run Script results is in the SCCM console monitoring workspace.
The two other options for showing the results of Run Script are Script Output and Script Exit Code. Script output gives you the details of Mode, Last Write Time, Directory, and Length name.
All these details are coming to the SCCM server in almost real-time through the fast channel push notification method.
We are on WhatsApp now. To get the latest step-by-step guides, news, and updates, Join our Channel. Click here. HTMD WhatsApp.
Author
Anoop C Nair is Microsoft MVP! He is a Device Management Admin with more than 20 years of experience (calculation done in 2021) in IT. He is a Blogger, Speaker, and Local User Group HTMD Community leader. His main focus is on Device Management technologies like SCCM 2012, Current Branch, and Intune. He writes about ConfigMgr, Windows 11, Windows 10, Azure AD, Microsoft Intune, Windows 365, AVD, etc.
Let’s discuss troubleshooting SCCM Issues with SuperFlow: A Newbie Guide Configuration Manager ConfigMgr. I have a post about troubleshooting steps for newbies using flowcharts. SCCM flowcharts are the best way to understand the workflow/data flow/process of each SCCM component.
The SuperFlow is an interactive content model. The SCCM SuperFlow provides an interactive content model structured for viewing documentation.
In this post, you will find all the information you need to troubleshoot SCCM issues using SuperFlow. This guide is perfect for newbies navigating Configuration Manager (ConfigMgr).
Learn the SCCM Client Installation process with SuperFlow
Learn the SCCM Client Assignment Process with SuperFlow
Learn the SCCM Backup Process with SuperFlow
Learn the SCCM Restore Process with SuperFlow
Download SCCM SuperFlows
Troubleshoot SCCM Issues with SuperFlow A Newbie Guide Configuration Manager ConfigMgr – Table 1
What are SCCM SuperFlows? SCCM Troubleshooting Guide for Newbies with SuperFlow
I have a YouTube channel. Subscribe here to watch and learn about SCCM with the video tutorials about SCCM-related issues and installations. I also have a Facebook page here. This is also where I usually upload the SCCM/Intune-related videos.
Troubleshoot SCCM Issues with SuperFlow A Newbie Guide Configuration Manager ConfigMgr – Video 1
What is SCCM SuperFlow?– Troubleshoot SCCM Issues with SuperFlow A Newbie Guide Configuration Manager ConfigMgr
Each SuperFlow includes comprehensive information about a specific SCCM data flow, workflow, or process. The SCCM SuperFlow Contains the following.
Detailed Information
Procedures
Sample Log entries
Best practices
Real-world scenarios
Troubleshooting information
Security information
Animations
Learn the SCCM Client Installation Process
The CCMSetup process superflow explains how CCMSetup installs the SCCM clients.
Troubleshoot SCCM Issues with SuperFlow A Newbie Guide Configuration Manager ConfigMgr – Fig.1
The CCMSetup client installs flow for the SCCM CB version has not been updated. However, it is better to get the basics right about installing the SCCM Client. When you have a problem with SCCM client installation, this superflow will help you troubleshoot and resolve the issue.
Two log files are associated with this CCMSetup superflow and SCCM client installation process. SCCM client setup file “CCMSetup.exe” searches for the SCCM Management Point (then Distribution Point) server for the rest of the client installation and prerequisite files.
CCMSetup.log
Client.MSI.log
Learn the SCCM Client Assignment Process with SuperFlow
The client assignment starts once the SCCM client is installed successfully on a workstation. The client will be able to receive the policies from the server after the client is assigned to a particular SCCM site.
When the SCCM client is installed successfully, it is considered an unmanaged device but not assigned to a site. There are two methods for assigning clients: manual and auto-site. The SCCM client superflow explains these two methods.
Troubleshoot SCCM Issues with SuperFlow A Newbie Guide Configuration Manager ConfigMgr – Fig.2
Learn the SCCM Backup Process with SuperFlow
The SCCM backup process is changed in SCCM CB. Microsoft fully supports SQL backup, so there is no need to take a full SCCM backup. However, in some scenarios, we still need one. SCCM backup SuperFlow helps to understand the process of SCCM full backup.
SCCM backup is initiated by a scheduled maintenance task or manually starting the SCCM backup service. Once the backup service is created, the backup snapshot destination is prepared, and backup logging starts.
The SMS VSS writer (SMS_SITE_VSS_WRITTER) and SQL server VSS writer (SMS_SITE_SQL_BACKUP) services will be triggered as part of the SCCM backup. These two services will help start VSS snapshots for site settings and databases. The Smswriter.log file provides more troubleshooting details.
Troubleshoot SCCM Issues with SuperFlow A Newbie Guide Configuration Manager ConfigMgr – Fig.3
The first step is to specify the backup files to restore. SCCM will verify the backup patch to determine whether you have a valid backup. Site data and the SQL database will then be verified and restored.
Troubleshoot SCCM Issues with SuperFlow A Newbie Guide Configuration Manager ConfigMgr – Fig.4
We are on WhatsApp now. To get the latest step-by-step guides, news, and updates, Join our Channel. Click here. HTMD WhatsApp.
Author
Anoop C Nair is Microsoft MVP! He is a Device Management Admin with more than 20 years of experience (calculation done in 2021) in IT. He is a Blogger, Speaker, and Local User Group HTMD Community leader. His main focus is on Device Management technologies like SCCM 2012, Current Branch, and Intune. He writes about ConfigMgr, Windows 11, Windows 10, Azure AD, Microsoft Intune, Windows 365, AVD, etc.


