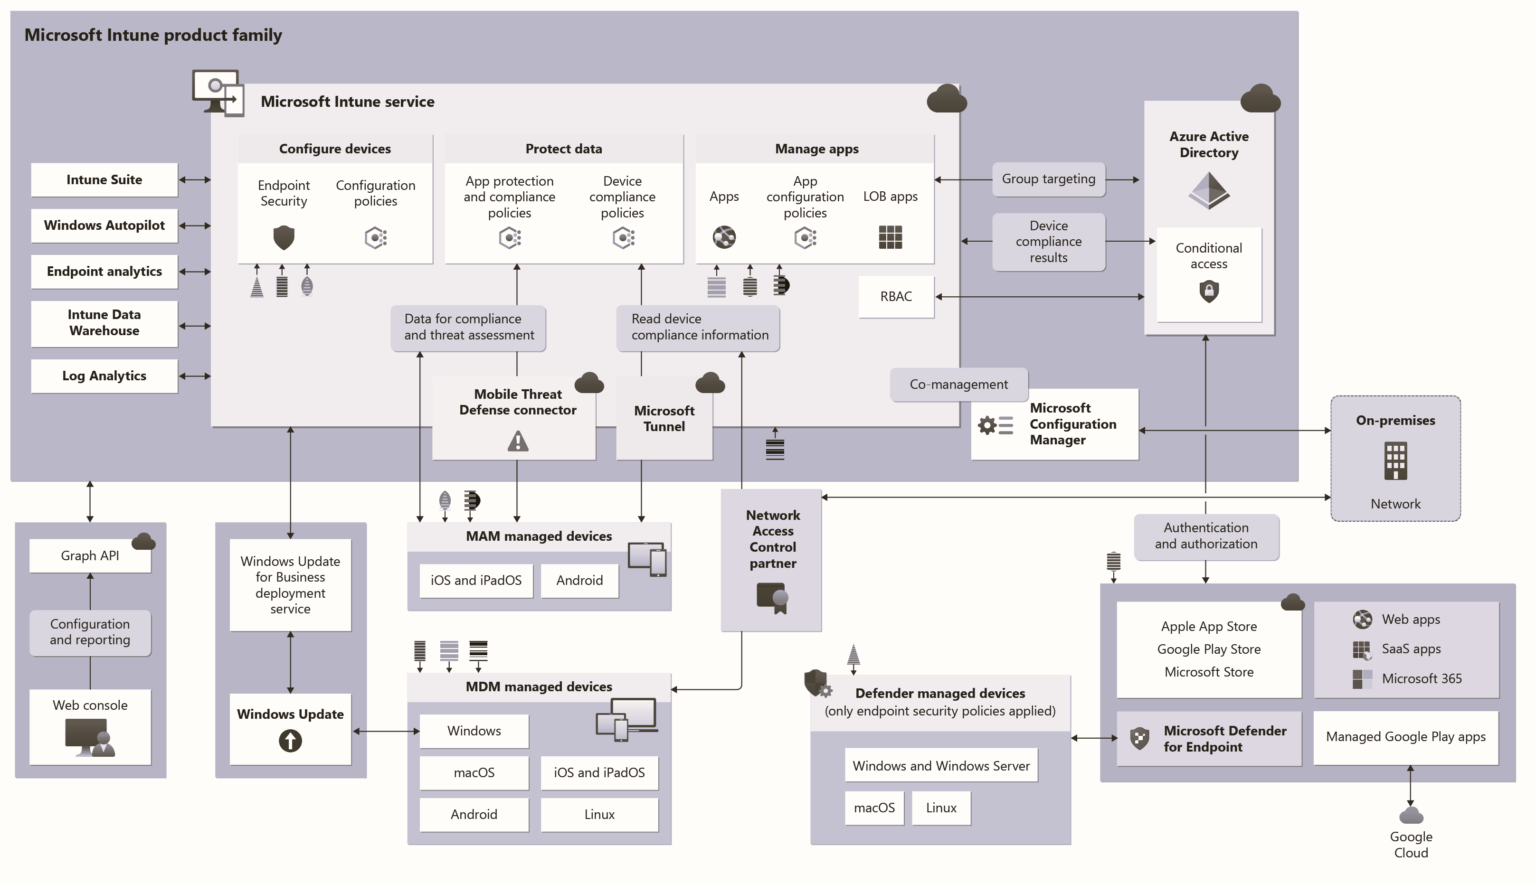
Microsoft Intune is the SaaS solution provided by Microsoft. Microsoft Intune is a cloud-based desktop and mobile device management tool. This supports Mac OS, iOS, Android, and Windows 10. This cloud solution is used as a modern management tool.
This MDM solution can be integrated with SCCM, Azure AD, and Active Directory. This place gives you a great opportunity Learn Microsoft Intune and become an expert with Intune.
This solution can be used to deploy UWP applications, Security policies, Configuration policies, WiFi profiles, PKI certificates, and so on.
This solution is future-proof When you take a look at the Desktop (43.29%) Vs. Mobile (52.29%) Vs. Tablet (4.42%) Market Share Worldwide for the last year, you could see that mobile devices are leaders. So, Mobile Device Management is very critical, and this is a new world of opportunities for IT Pros like us. From my perspective, learning this solution is very important for SCCM admins.
Intune is an enterprise mobility management (EMM) solution from Microsoft. The EMM provider helps to manage mobile devices, network settings, and other mobile services and settings. This solution is nothing but a combination of Device, Application, Information Protection, Endpoint Protection (antivirus software), and Security/Configuration policy management solution (SaaS) facilitated by Microsoft in the Cloud.
Additionally, this solution has a feature called compliance policy, which can be integrated with the Azure AD “Conditional Access” policy to restrict access to company resources.
Why is the available action disabled from Android for Work App Deployment in Intune? Configuring Android for Work in Intune is not very difficult. However, there are some restrictions when you deploy a volume-purchased application to Android for Work devices.
Microsoft recently announced support for Android for Work (A4W)in Intune, and I’ve been eagerly anticipating the arrival of an A4W-supported device. However, it’s important to note that not all Android devices are compatible with A4W. For those interested, Google has provided a comprehensive list of devices supported by Android for Work.
The Android work profile feature enables users to use a single device for personal and work purposes. Our guide breaks down the steps to help you efficiently manage these devices through Intune, ensuring seamless work and personal data integration.
We can deploy Android for Work Volume Licensed apps only to user groups. The ONLY deployment actions/options enabled in the drop-down list are Not Applicable, Required, and Uninstall actions. The “available” deployment Action/option is DISABLE for Android for Work applications.
Android For Work App Deployment Options Available Required
Let’s explore the possibilities for deploying Android for Work apps, including “Available” and “Required” deployment types. The following video provides a detailed overview of these deployment options, demonstrating how to manage app distribution within your organization effectively.
Why Available Action is Disabled from Android for Work App Deployment in Intune – Video 1
Why Available Action is Disabled from Android for Work App Deployment in Intune
In the screenshot below, you need to specify the type of deployment you want to execute for this software and review the corresponding deployment settings. Choose the appropriate deployment settings for the software. Note that the “Available” install option is disabled, as shown in the window.
Why Available Action is Disabled from Android for Work App Deployment in Intune – Fig.1
Recently, I noticed that the Android for Work Volume-Purchased App deployment action called “Available” has been enabled for some of the tenants. These “Google Play for Work” applications can be deployed to user/device groups in those tenants where the available action is enabled.
Details Why Available Action is Disabled from Android for Work App Deployment in Intune Endpoint Manager
Android for Work Volume-Purchased application deployment option is called “Available,” and volume-purchased app deployment to device groups is ONLY available with new grouping experience in the Azure portal. Hence, this feature is tied to Azure AD group targeting, requiring migration from the Intune Silver Light portal to Azure.
You can’t see all the Android for Work apps even when you go to the Google Play for Work app store from your Android for Work-supported devices.
It will only list the apps that are deployed from the Intune console. Why Available Action is Disabled from Android for Work App Deployment in Intune Endpoint Manager
App deployment action details are well documented in the TechNet article here. When the app is displayed in the Volume-Purchased Apps node of the Apps workspace, you can deploy it just like any other app.
You can deploy the app to groups of users only. Currently, you can only select the Required and Uninstall actions. Starting in October 2016, we will begin adding the available deployment action for new tenants.
Why Available Action is Disabled from Android for Work App Deployment in Intune – Fig.2
We are on WhatsApp now. To get the latest step-by-step guides, news, and updates, Join our Channel. Click here. HTMD WhatsApp.
Author
Anoop C Nair is Microsoft MVP! He is a Device Management Admin with more than 20 years of experience (calculation done in 2021) in IT. He is a Blogger, Speaker, and Local User Group HTMD Community leader. His main focus is on Device Management technologies like SCCM 2012, Current Branch, and Intune. He writes about ConfigMgr, Windows 11, Windows 10, Azure AD, Microsoft Intune, Windows 365, AVD, etc.
Intune: How to Enroll Android for Work Supported Devices for Management | Google Play Store for Work? Android for Work enrollment to an Enterprise Mobility Management (EMM) solution or Intune is slightly different from enrollment for iOS and Windows devices.
This difference is not because of your EMM solution rather. This is the process/framework Google implemented to complete Android for Work enrollment. We need to configure Intune to support Android for Work, and I have a post that explains the prerequisites.
Microsoft announced Intune’s supportability for Android for Work (A4W) a few months back. Since then, I have been waiting for an A4W-supported device. Yes, that means A4W does not support all Android devices. Here is Google’s list of A4W-supported devices.
Our article guides you through configuring theAndroid Enterprise platform for use with Intune Device Management. You can easily set up Intune Enrollment to manage Android Enterprise devices, and you can easily manage corporate-owned Android Enterprise devices with Microsoft Endpoint Manager Intune.
Intune Android for Work Nexus 6s Enrollment Experience
Let’s talk about the video showing the Intune Android for Work Nexus 6s enrollment experience. This video provides a detailed look at how to enrol a Nexus 6s using Intune for Android for Work, making the process clear and easy to understand.
Intune How to Enroll Android for Work Supported Devices for Management | Google Play Store for Work – Video 1
Details Google Play Store for Work
First, we need to ensure that Android for Work (A4W) is enabled for your Intune tenant, and then we need to configure Intune to support A4W. Do you want to allow only Android for Work-supported devices to enrol in Intune? This option is not available out of the box in Intune.
I’m sure Microsoft will develop a new option in the new Azure portal, as I noted in the previous blog post about the enrollment restriction rule in Intune. Android for Work is currently supported on devices running Android 5.0 Lollipop, which later supports a work profile.
The second step is to ensure you have configured Android for Work configuration policies in Intune and Android configuration policies. Different sets of policies in Intune only support Android for Work.
Intune Compliance policies are the same for “Classic” Android management and Android for Work management. Suppose you plan to deploy VPN and Wi-Fi profiles to Android for Work-supported devices. In that case, Intune supports some custom configuration policies (OMA-URI).
Intune How to Enroll Android for Work Supported Devices for Management | Google Play Store for Work – Fig.1
Android for Work?
As a third step, you need to confirm whether your device supports “Android for Work” or not. Where is the list of Android-supported Work devices? OK, no worries, Google has already published the list here.
Android for Work?
If your device has not been supported, Intune will automatically enroll it for “classic” Android management.
So you won’t be able to see any work profile being created on your phone.
Intune How to Enroll Android for Work Supported Devices for Management | Google Play Store for Work – Table 1
Intune How to Enroll Android for Work Supported Devices for Management | Google Play Store for Work – Fig.2
More Details
Once you have identified that the device you are trying to enroll in is supported, you should open the “Google Play Store” and Install the Intune company portal. Once the company portal is installed, you can log in with your corporate credentials, and the first phase of the setup will start, creating a Work profile for Android.
Once the Work profile has been created, the company portal application will ask you to go to the Work profile and launch the company portal from the work profile to continue setting up. So, you need to log in to the company portal twice as part of Android for work enrollment.
The work profile will be controlled by an organization you have enrolled in, and the Company Portal app will have access to Work profile-related data.
Intune How to Enroll Android for Work Supported Devices for Management | Google Play Store for Work – Fig.3
The above step completed half of the enrollment process. The Intune company portal application initiated the creation of the work profile. Once the work profile has been created, you must log in to another instance of the company portal app, which resides in the work profile.
The company portal app in the work profile does the 2nd half of the enrollment process. The company portal helps the device complete Work Place Join, Azure AD Join, and Intune enrollment, as seen in the above video.
Intune How to Enroll Android for Work Supported Devices for Management | Google Play Store for Work – Fig.4
Google Play Store for Work
Once you complete the Company access setup, you can access company resources and apps depending on the Conditional access, compliance, and configuration policies. The Android device must comply with compliance policies and meet the conditions mentioned in the conditional access policies by the Intune Admin.
Once everything is okay, you can browse the applications from “Google Play Store for Work“. Browse and install applications from the Google Play Store for work. I will cover the Android application deployment scenarios in an upcoming blog here (coming soon).
Outlook is one of the applications you can directly deploy as “available” or “required” from the Intune portal. Once the Outlook app has been installed, you can directly configure your official mail without any particular configuration. Email profile deployment via Intune is not required for automatic corporate mail configuration.
You need to put in the email ID. No other configuration is required; instead, everything is automatically configured. As I mentioned in the blog post here, you can add applications to the Google Play Store for work with the existing Gmail account. Once these apps are synced with Intune, you can deploy them to groups.
Intune How to Enroll Android for Work Supported Devices for Management | Google Play Store for Work – Fig.5
We are on WhatsApp now. To get the latest step-by-step guides, news, and updates, Join our Channel. Click here. HTMD WhatsApp.
Author
Anoop C Nair is Microsoft MVP! He is a Device Management Admin with more than 20 years of experience (calculation done in 2021) in IT. He is a Blogger, Speaker, and Local User Group HTMD Community leader. His main focus is on Device Management technologies like SCCM 2012, Current Branch, and Intune. He writes about ConfigMgr, Windows 11, Windows 10, Azure AD, Microsoft Intune, Windows 365, AVD, etc.
Intune Application Policy Manager RBA Controls In MEM Portal | Endpoint Manager Role-Based Access? We will discuss the access rights of the built-in Intune RBA role, Intune Application Manager.
Ideally, this role should have access to Manage mobile apps and read device information, depending on the scope of users/devices assigned to it.
Do you know what the scope is? “The users or devices that a specified person (the member) can manage.” If you are an SCCM admin, the SCOPE option is already in SCCM 2012 and the CB console. I have another post that discusses the details of Configuration Manager RBAC.
This post will examine the permissions associated with the Intune application manager build-in role. According to Microsoft documentation, this role ” Manages and deploys applications and profiles.”
Intune Application Policy Manager RBA Controls In MEM Portal
We will dive deeply into this topic and explain the actions an Intune app admin can perform from the MEM portal. Following are the access permissions given to the Intune APP Manager RBAC role.
Intune Application Policy Manager RBA Controls In MEM Portal | Endpoint Manager Role-Based Access – Fig.1
Managed Apps– Intune Application Policy Manager RBA Controls In MEM Portal
Managing your organization‘s IT infrastructure is essential to effectively controlling access to various resources. Here’s a breakdown of permissions for managing apps, devices, and mobile apps.
Assign managed apps to a security group
Create managed apps
Delete managed apps
Read managed apps
Update managed apps
Wipe Managed apps Managed Devices
No Access to delete devices
Access to read device information
No Access to update device properties Mobile Apps
Assign mobile apps to a security group
Create mobile apps
Delete mobile apps
Read mobile apps
Update mobile apps
Mobile Apps
Assign mobile apps to a security group
Create mobile apps
Delete mobile apps
Read mobile apps
Intune Application Policy Manager RBA Controls In MEM Portal | Endpoint Manager Role-Based Access – Table 1
Overall Access Rights of Intune Tiles– Intune Application Policy Manager RBA Controls In MEM Portal
It can administrate some actions in managing apps and configuring device tiles. Access is denied to perform any activities in Conditional Access, Device Enrollment, Access control, and Set device compliance tiles.
You are allowed to set up certificate authority in the Configure devices tile. However, you do not have access to view profiles.
You are allowed to view the device information in the Device and Groups tile.
Access is denied to create/delete new or existing groups or user profiles. It doesn’t matter whether the Intune policy manager is editing the groups in SCOPE. In many places, save and add buttons are enabled, but when we try to save, we get an error.
Access is denied to change device and user settings in the Manage user tile.
Access is denied to the Intune Silverlight console.
Access is denied to the Intune App Protection section, and Intune mobile application management is not allowed for Intune App Managers. These app protection options are probably part of the Azure portal’s Intune—Manage Apps tab.
Access Rights – Manage Apps (Manage Apps and Mobile Apps) – Intune Application Policy Manager RBA Controls
You can create new mobile apps and edit mobile apps uploaded by admins. Access is Denied to edit the managed apps, which are automatically uploaded.
Access is denied to remove assignments/deployments to a group outside the Intune application manager’s scope.
Access is denied to remove assignments/deployments from a group in the Intune application manager’s scope. This should be allowed!
If the user group is within the scope of the Intune application manager, you can add an assignment to the mobile/manage app.
Access Denied adding an assignment to mobile/manage app if the user group is out of the scope of Intune application manager.
App Protection Policies are getting hung while trying to edit (or create) existing (or new) app protection policies from the Intune App Manager account.
Allowed to perform App Selective wipe option from Intune app manager account. Allowed to perform app selective wipe only on “in scope users/devices”.
Access is denied to edit Company portal Branding from the Intune app manager account.
Intune Application Policy Manager RBA Controls In MEM Portal | Endpoint Manager Role-Based Access – Fig.2
We are on WhatsApp now. To get the latest step-by-step guides, news, and updates, Join our Channel. Click here. HTMD WhatsApp.
Author
Anoop C Nair is Microsoft MVP! He is a Device Management Admin with more than 20 years of experience (calculation done in 2021) in IT. He is a Blogger, Speaker, and Local User Group HTMD Community leader. His main focus is on Device Management technologies like SCCM 2012, Current Branch, and Intune. He writes about ConfigMgr, Windows 11, Windows 10, Azure AD, Microsoft Intune, Windows 365, AVD, etc.
Beginners Guide Intune Android for Work Google Play for Work Setup? Android for work has always been an exciting topic for me. I’m a fanboy of Android devices 🙂 I started testing Intune + SCCM MDM management with Android devices in 2014. I was eagerly waiting for “Android for Work” support with Intune.
Microsoft announced Intune’s supportability for Android for Work (A4W) a few months back. Since then, I have been waiting for an A4W-supported device. Yes, that means all Android devices are not supported by A4W. Here is Google’s list of A4W-supported devices.
The Android work profile feature allows users to have a single device for personal and work purposes. Our guide simplifies the process so that you can efficiently manage these devices using Intune.
Intune Android for Work MDM – Admin Config Enrollment Removal
Let’s talk about managing Intune Android for Work MDM (Mobile Device Management) and how to configure enrollment removal for administrators. The video below explains all the details about Intune Android for Work MDM.
Beginners Guide Intune Android for Work Google Play for Work Setup – Video 1
Beginners Guide Intune Android for Work Google Play for Work Setup
In this post, I will try to cover the prerequisites of Android for Work, Intune portal admin configurations, Adding Google Play apps to Google for Work, Android for Work Device enrollment, Work profile creation, and Removal of Android for the work profile.
First of all, you need to create a baseline of Android devices that you want to support in your environment. Following are some of the points that we need to take care of as part of the Android for Work implementation:-
Beginners Guide Intune Android for Work Google Play for Work Setup – Fig.1
Preparation Work – Android for Work Admin Configurations
Devices with Android 5.0 Lollipop will later only have a work profile and Android for work support as per Google. This has nothing to do with Microsoft and Intune. Some Android for Work settings are available only for Android 6.0 and later.
It’s essential to understand Android for Work does NOT support all android devices in the market- a list of supported devices -is here.
Bind your Intune and Google for Work accounts from the Silverlight Intune portal because this feature is not yet enabled in the Azure Intune blade.
Create a Google account or use an existing account to sign up for Android for Work with the EMM provider.
Add applications from Google Play to the Google for Work store and then sync these apps to Intune. To initiate a new sync between Intune and the Google for Work store, click on the Sync button in the Intune console.
Sync the apps from the Intune console – Admin > Mobile Device Management > Android for Work. After Sync, the apps will be visible under – Intune console – Apps – Volume Purchased app
I recommend using the following option after the pilot testing in your production environment. Enable the option “Manage supported devices as Android for Work – (Enabled) All devices that support Android for Work are enrolled as Android for Work devices. Any Android device not supporting Android for Work is enrolled as a conventional Android device”.
The only caveat is that we don’t have the option to restrict the devices that are NOT supported by Android for Work from enrolling into Intune. Beginners Guide Intune Android for Work Google Play for Work Setup Endpoint Manager | MEM?
Beginners Guide Intune Android for Work Google Play for Work Setup – Fig.2
Notes from the Field – Android for Work Security Policies
As an initial release, Intune is out of the box: “Security and Work profile policies are very limited for A4W”. I suppose you have to combine A4W and Android policies to support Android devices in your organization.
OMA URI custom policies are supported with A4W. However, custom policies, along with Intune, support only a few options. I know only 2 policies supported by this feature, which are WiFi and VPN profiles.
Beginners Guide Intune Android for Work Google Play for Work Setup – Fig.3
End-User Experience – Android for Work
Enrollment of Android for work devices is as straightforward as the normal Android device enrollment for the first part of it. The second part is more towards logging into the Intune company portal from the Android for Work context and continuing the enrollment process.
End-User Experience – Android for Work
Work profiles on Android devices will get be created via Intune company portal enrollment.
This will happen only for Android for Work supported devices.
If you have a device that is not supported for Android for Work by Google, then the enrollment won’t create a work profile, etc… it will be normal enrollment.
Beginners Guide Intune Android for Work Google Play for Work Setup – Table 1
We are on WhatsApp now. To get the latest step-by-step guides, news, and updates, Join our Channel. Click here. HTMD WhatsApp.
Author
Anoop C Nair is Microsoft MVP! He is a Device Management Admin with more than 20 years of experience (calculation done in 2021) in IT. He is a Blogger, Speaker, and Local User Group HTMD Community leader. His main focus is on Device Management technologies like SCCM 2012, Current Branch, and Intune. He writes about ConfigMgr, Windows 11, Windows 10, Azure AD, Microsoft Intune, Windows 365, AVD, etc.
This post explains Intune RBAC roles and permissions in the Intune Admin Center Portal. We will discuss the access rights of the built-in Intune RBAC role and Configuration policy manager.
Ideally, this role should have access to Manage and deploy configuration settings and profiles, depending on the scope. Before going into details, let me explain the scope.
Intune RBAC (Role-Based Access Controls) is the workflow that helps organizations segregate the roles and responsibilities of different support teams by providing them with limited access to specific resources. “The users or devices that a specified person (the member) can manage.” If you are an SCCM admin, the SCOPE option exists in SCCM 2012 and the CB console.
Granular control delegates permissions to Level 1, 2, and 3 Intune teams from different operating groups (entities/opcos). Intune admins’ assigned permissions are limited to specific user or device groups. View permissions of Intune objects can be controlled/managed using RBAC.
This video will explain Intune RBAC Strategic Options, Role-Based Access Controls, Scope Groups, Intune Objects, and Roles.
Intune RBAC Roles Permissions in the Intune Admin Center Portal – Video 1
What is Intune RBAC?
RBAC helps Intune Admins to control who can perform various Intune tasks within your enterprise. There are nine (9) built-in Intune roles (RBAC roles). The list of Intune RBAC built-in roles is updated in the table.
In this post, I will explain the access rights of Intune’s default role, Configuration Policy Manager. I have created a user named Kaith in the Azure Active Directory. This user is assigned Configuration policy manager access, and the scope is set to the group “All Bangalore Users.”
The Intune configuration policy manager can access Assign, Create, Delete, Read, and Update profiles. However, we will conduct a deep dive to understand more details about the access rights for this role.
Intune RBAC Roles Permissions in the Intune Admin Center Portal Fig. 1
Intune RBAC – Tired Hierarchy
Azure AD is the primary identity repository for Intune! The Intune Full Admin permissions—Azure AD. This means that user identities and access rights are managed through Azure AD, which integrates easily with Intune. For Intune Full Admin permissions, users need corresponding permissions in Azure AD.
Global Admin Role (Tier 1)
Intune Service Admin Role (Tier 2)
Intune RBAC Permissions – Intune Portal
Tier 3 Roles – App Admin, Helpdesk Admin, etc…
Updated Built-In Inutune RBAC Roles
Let’s check the built-in Intune RABC roles (endpoint manager roles) available in the MEM admin center portal. The permissions in Azure AD are crucial for managing users, devices, and policies effectively within Intune.
Updated Built-In Inutune RBAC Roles
Details
Application Manager
Built-in Role
Endpoint Security Manager
Built-in Role
Read-Only Operator
Built-in Role
School Administrator
Built-in Role
Policy and Profile manager
Built-in Role
Help Desk Operator
Built-in Role
Intune Role Administrator
Built-in Role
Cloud PC Administrator
Built-in Role
Cloud PC Reader
Built-in Role
Intune RBAC Roles Permissions in the Intune Admin Center Portal Table 1
Endpoint Manager Roles
Let’s understand the different types of roles available within Intune RBAC workflow. There are built-in roles and custom roles, which I have given examples of in previous posts.
Assign administrators to Endpoint Manager Roles. Create and configure custom Endpoint Manager Roles. You are allowed to edit the Intune Policy and Profile Manager.
Even the profile is ONLY deployed to out-of-scope users/groups.
Intune Role-Based Access (RBA) rules don’t respect the scope of the editing profile.
This should NOT be allowed. Editing should be allowed only to profiles assigned ONLY to the Intune policy manager’s scope of users or devices (Intune policy manager = Kaith). Intune RBAC roles are still in development.
Access is denied to remove and add assignments to a profile already deployed to users outside the scope. However, if the admin tries to deploy profiles to users in the scope, the addition and removal of assignments should be allowed.
Access is denied to remove assignments to profiles targeted to the users or groups in scope. This should be allowed!
They can delete all the profiles, even if they target out-of-scope users. This should NOT be allowed! If the profile is assigned only to in-scope users, then the deletion of the profile should be allowed.
They can enable/disable certificate authority connectors for SCEP or PFX profile deployment. Intune RBAC roles are still in development.
Login to MEM Admin Center (Intune).
Navigate to tenant admin -> Roles -> Endpoint Manager Roles.
Intune RBAC Roles Permissions in the Intune Admin Center Portal Fig. 2
Intune RBAC Access Rights – Application Manager
It is allowed to remove assignments of applications that are already targeted to users outside the scope of an Intune Application Manager. This should NOT be allowed. If the application is deployed/assigned to users who are in scope, then removal of the assignment should be allowed.
Allowed to add assignments to the application, even if the user’s Intune application manager is targeting is out of scope for them. This should NOT be allowed. Assign administrators to Endpoint Manager Roles and Create and configure custom Endpoint Manager Roles.
Assignments should be added to the Application policy only when the targeted users are within the scope of an Intune application manager.
Intune RBAC Roles Permissions in the Intune Admin Center Portal Fig. 3
Intune RBAC – Endpoint Security Manager
Let’s discuss Intune RBAC—Endpoint Security Manager. You can assign administrators to Endpoint Manager Roles and create and configure custom Endpoint Manager Roles.
Intune RBAC Roles Permissions in the Intune Admin Center Portal Fig. 4
Intune Read-Only Operator
Name – Read-Only Operator. Description – Read-Only Operators view user, device, enrollment, configuration, and application information and cannot change Intune.
Intune RBAC Roles Permissions in the Intune Admin Center Portal Fig. 5
Intune School Administrator
Name—School Administrator. Description—School Administrators can manage apps and settings for their groups. They can also remotely manage devices, including locking, restarting, and retiring them from management.
Intune RBAC Roles Permissions in the Intune Admin Center Portal Fig. 6
Intune RBAC – Help Desk Operator
Name – Help Desk Operator. Description – Help Desk Operators perform remote tasks on users and devices and can assign applications or policies to users or devices.
Intune RBAC Roles Permissions in the Intune Admin Center Portal Fig. 7
Intune Role Administrator
Name – Intune Role Administrator. Description – Intune Role Administrators manage custom Intune roles and add assignments for built-in Intune roles. It is the only Intune role that can assign permissions to Administrators.
Intune RBAC Roles Permissions in the Intune Admin Center Portal Fig. 8
Cloud PC Administrator
Name: Cloud PC Administrator. Description: The Cloud PC Administrator has read and write access to all Cloud PC features within the Cloud PC blade.
Discuss the Intune Admin Configuration Policy Manager and Intune RBA Permissions Issues. The video below explains all the details about these topics.
Intune RBAC Roles Permissions in the Intune Admin Center Portal – Video 2
Overall Access Rights of Intune Tiles
Allowed to perform administrative activities in configuring devices and Setting device compliance tiles. Allowed to view details about users and groups in managing users’ tile.
Access is denied to perform any activities in Manage Apps, Conditional Access, Device Enrollment, Device and Groups, and Access control tiles.
You can view objects in the Manage Users tile – Users and Groups.
Access is denied to create/delete new or existing groups. It doesn’t matter if the Intune policy manager is editing the groups in SCOPE.
Access is denied to change device and user settings in the Manage user tile.
Access is denied to the Intune Silverlight console.
Intune Administrator Role Permissions
Let’s check Intune administratorRole permissions from the following table. The table below helps you show the Actions and their corresponding details. Read, Delete, Wipe, Assign, Create, and Update are Intune permissions that can be assigned for each Intune object.
Admin Groups – Admin group users are the administrators assigned to this role
Scope Groups – Administrators in this role assignment can target policies, applications, and remote tasks to Azure AD Device/User Groups
We are on WhatsApp now. To get the latest step-by-step guides, news, and updates, Join our Channel. Click here. HTMD WhatsApp.
Author
Anoop C Nair is Microsoft MVP! He is a Device Management Admin with more than 20 years of experience (calculation done in 2021) in IT. He is a Blogger, Speaker, and Local User Group HTMD Community leader. His main focus is on Device Management technologies like SCCM 2012, Current Branch, and Intune. He writes about ConfigMgr, Windows 11, Windows 10, Azure AD, Microsoft Intune, Windows 365, AVD, etc.
Let’s discuss how to Fetch Intune Azure AD Details from Graph API Intune PowerShell Scripts. Now, Microsoft Graph API is the buzzword. How can Microsoft Graph API fetch the details from Azure Active Directory (Azure AD/AAD) and Microsoft Intune? And a list of Intune PowerShell Scripts samples. I won’t provide any Graph API scripts to fetch details in this post.
APIs have always been an alien term for me. The rest of the API was everywhere; now it’s Graph API. Have you ever tried Facebook Graph API? So, the entire industry is taking the path of Graph API!
In one of our articles, we provide a detailed guide on using Microsoft Graph Explorer, emphasizing its utility for beginners. This tool is pivotal for understanding Graph API queries, particularly for those starting. We walk users through the initial steps of accessing and utilizing the Graph Explorer, focusing on its simplicity and user-friendly interface.
The blog post “Configuring Intune Bitlocker grace period“ illustrates a real-world example of using Intune Graph Explorer. This scenario involves setting up a grace period for BitLocker, a feature not configurable through the MEM Admin Center portal.
Fetch Intune Azure AD Details from Graph API Intune PowerShell Scripts
Microsoft Graph is a versatile Application Programming Interface (API) offering a unified endpoint, https://graph.microsoft.com, to access a wealth of data, intelligence, and insights across Microsoft 365 and other Microsoft Cloud services.
Fetch Intune Azure AD Details from Graph API Intune PowerShell Scripts – Fig.1
In this post, I would like to help by providing basic details of the Microsoft Graph API. I will explain how to start using Graph API graphically (not programmatically) and how Graph API would be helpful for IT Pros in their day-to-day lives. Microsoft Intune admins can analyze a device’s or user’s details from Graph API.
We can only get limited details of objects from the Azure AD portal; however, loads of more information can be fetched from Graph API via Web browsers. You can perform all the GET and other supported operations from the following URL. Remember to sign in to thetenant.
This video guide teaches you how to use Intune Graph Query and some sample queries. It’s a beginner’s guide, so it starts with the basics. Microsoft Graph Explorer is a special tool for system admins and developers. With it, you can talk to Intune and ask it to fetch, change, or remove information.
Fetch Intune Azure AD Details from Graph API Intune PowerShell Scripts – Video 1
Microsoft Graph
Graph Explorer is one way to fetch, change, or remove data or configurations from Intune services. You can quickly sign in to the graph—microsoft portal with Intune Admin credentials.
Launch Microsoft Graph - URL --> https://graph.microsoft.io/en-us/graph-explorer
https://developer.microsoft.com/en-us/graph/graph-explorer
Fetch Intune Azure AD Details from Graph API Intune PowerShell Scripts – Fig.2
When you sign in for the first time, you need to agree to give Graph Explorer the following permissions. Click on the Agree button to proceed.
Fetch Intune Azure AD Details from Graph API Intune PowerShell Scripts – Fig.3
There are two versions of Graph Explorer available at the moment: 1.0 and Beta. I was having a hard time connecting to the Graph API, but it was okay when I wanted to retrieve my user information.
But when I tried to fetch the details for the entire tenant, it was asked to agree or accept new Admin consent, as you can see in the following paragraph.
This query requires additional permissions. If you are an administrator, you can click here to grant them for your entire organization. You can also try the same request against your tenant by creating a free Office 365 developer account.
When I tried to click on the “HERE” button to accept the consent, it gave me an odd error: “AADSTS90002: No service namespace named ‘organizations‘ was found in the data store.” Ryan and Panu helped me get rid of this error.
To accept this admin consent, you don’t have to create manual applications or run any PowerShell scripts! It’s already available in your enterprise applications blade in the Azure console.
Fetch Intune Azure AD Details from Graph API Intune PowerShell Scripts – Fig.4
The following are some samples of graph API GET queries to retrieve details from Intune and Azure Active Directory (AAD). Graph API also allows for the following three types of actions: POST, PATCH, and DELETE.
https://graph.microsoft.com/beta/users/anp@SCZ.onmicrosoft.com/ownedDeviceshttps://graph.microsoft.com/beta/deviceAppManagement/mobileAppshttps://graph.microsoft.com/beta/users/https://graph.microsoft.com/beta/applications Following is some of the extracts of device management mobile app.
WhatsApp is one of the applications at “https://graph.microsoft.com/beta/deviceAppManagement/mobileApps.” Similarly, we can retrieve a user’s owned devices and device status through Graph API GET commands. Some of these details are available ONLY through Graph API. This will be an excellent help for Intune admins when troubleshooting issues.
Graph AP Actions
POST
PATCH
DELETE
Fetch Intune Azure AD Details from Graph API Intune PowerShell Scripts – Table 1
cache-control: private
content-type: application/json;odata.metadata=minimal;odata.streaming=true;
request-id: 604557b1-409b-4749-8w32d-d754844b2181
client-request-id: 6se357b1-409b-4349-864d-d754844b2181
Status Code: 200
{
"@odata.context": "https://graph.microsoft.com/beta/$metadata#deviceAppManagement/mobileApps",
"value": [
{
"@odata.type": "#microsoft.graph.iosStoreApp",
"id": "ab8a5364-887d-44e7-a6cd-9684d2f279c3",
"displayName": "WhatsApp Messenger",
"description": "WhatsApp Messenger is a FREE messaging app available for iPhone and other smartphones. WhatsApp uses your phone's Internet connection (4G/3G/2G/EDGE or Wi-Fi, as available) to let you message and call friends and family. Switch from SMS to WhatsApp to send and receive messages, calls, photos, videos, and Voice Messages. \n\nWHY USE WHATSAPP: \n\n• NO FEES: WhatsApp uses your phone's
"publisher": "WhatsApp Inc.",
"largeIcon": null,
"createdDateTime": "2017-01-22T06:40:24.696692Z",
"lastModifiedDateTime": "2017-01-22T06:40:24.696692Z",
"isFeatured": false,
"privacyInformationUrl": null,
"informationUrl": null,
"owner": "",
"developer": "",
"notes": "",
"uploadState": 1,
"installSummary": null,
"bundleId": "net.whatsapp.WhatsApp",
"appStoreUrl": "https://itunes.apple.com/us/app/whatsapp-messenger/id310633997?mt=8&uo=4",
"applicableDeviceType": {
"iPad": false,
"iPhoneAndIPod": true
},
"minimumSupportedOperatingSystem": {
"v8_0": true,
"v9_0": false,
"v10_0": false
}
},
Fetch Intune Azure AD Details from Graph API Intune PowerShell Scripts – Fig.5
We are on WhatsApp now. To get the latest step-by-step guides, news, and updates, Join our Channel. Click here. HTMD WhatsApp.
Author
Anoop C Nair is Microsoft MVP! He is a Device Management Admin with more than 20 years of experience (calculation done in 2021) in IT. He is a Blogger, Speaker, and Local User Group HTMD Community leader. His main focus is on Device Management technologies like SCCM 2012, Current Branch, and Intune. He writes about ConfigMgr, Windows 11, Windows 10, Azure AD, Microsoft Intune, Windows 365, AVD, etc.
How do you organize the Endpoint Manager Portal Neat Clean for Intune Activities? The MEM portal is a one-stop shop for all the services in the Microsoft cloud. When users log in to a MEM portal for the first time, they can see all these services, which are already selected as favorite services by default.
The selection of favorite services in the MEM portal for individual users is not based on the user’s profile or access rights of the user. This is not good for new users in the Intune portal. They will struggle to find out their role-related services.
One of our articles helps you by showing the Intune Admin Portal walkthrough guide. It is one of the first things you have to learn. From this post, you understand what is where in the Intune admin portal (aka Microsoft Intune Admin Center).
How to Make Your Azure Intune Console Look Better – Video
The video guide on improving the look of your Azure Intune console is really helpful. It explains all the details step by step and provides easy-to-follow tips for making your console more visually appealing and user-friendly.
It’s an excellent resource for anyone who wants to enhance their Intune console’s visual experience and usability, whether they’re new to Intune or already using it.
How to Organize Endpoint Manager Portal Neat Clean for Intune Activities | Microsoft Intune – Video 1
How to Organize Endpoint Manager Portal Neat Clean for Intune Activities
For example, you are an Intune admin and can only access Intune and Azure AD users and groups. But if you log into the MEM portal, you will see loads of services that make no sense. You will also find it messy, and I’m sure you will get lost in the portal until you find the search button or Intune services.
Microsoft Azure Features
Create a resource
Home
Dashboard
All services
FAVORITES
SOL
All resources
Resource groups
App Services
Function App
SQL databases
Azure Cosmos DB
Virtual machines
Load balancers
Storage accounts
Virtual networks
Microsoft Entra ID
Monitor
Advisor
Microsoft Defender for Cloud
Cost Management + Billing
Help + support
How to Organize Endpoint Manager Portal Neat Clean for Intune Activities | Microsoft Intune – Table 1
How to Organize Endpoint Manager Portal Neat Clean for Intune Activities | Microsoft Intune – Fig.1
Don’t worry—a very friendly search option is available in the Azure portal. If you are an Intune admin, click on more services and type “Intune” in the search menu. You can see two Intune services: one for Intune (MDM) and the second for Intune App Protection (MAM without enrollment).
How to Organize Endpoint Manager Portal Neat Clean for Intune Activities | Microsoft Intune – Fig.2
To keep your Azure portal well organized, you must spend only 2-3 minutes when logging in for the first time. What do we need to do to get a neatly organized Azure portal? You log in to the Azure portal, click on the More services button, and then remove the services that are not relevant to you.
For example, Intune admins have nothing to do with “Virtual Machines,” so you can remove the Virtual machine service from your favorite menu. This will help you remove the Virtual machine shortcut from the left-side menu of the MEM portal.
How to Organize Endpoint Manager Portal Neat Clean for Intune Activities | Microsoft Intune – Fig.3
END Result:- Clean and Tidy Azure portal for Intune Admins. Remove all the services from the Azure portal except Azure Active Directory, Users and Groups, Intune, and Intune protection services.
How to Organize Endpoint Manager Portal Neat Clean for Intune Activities | Microsoft Intune – Fig.4
We are on WhatsApp now. To get the latest step-by-step guides, news, and updates, Join our Channel. Click here. HTMD WhatsApp.
Author
Anoop C Nair is Microsoft MVP! He is a Device Management Admin with more than 20 years of experience (calculation done in 2021) in IT. He is a Blogger, Speaker, and Local User Group HTMD Community leader. His main focus is on Device Management technologies like SCCM 2012, Current Branch, and Intune. He writes about ConfigMgr, Windows 11, Windows 10, Azure AD, Microsoft Intune, Windows 365, AVD, etc.
How to Create Azure AD Dynamic Device Groups for Windows BYOD CYOD Devices Microsoft Intune? In the previous post on how to Create Azure AD Dynamic Groups for Managing Devices using Intune, you might have seen the basic process for creating Azure AD dynamic user and device groups, along withexplanations about the syntax of the queries/rules.
We will also experience performance issues with Azure AD dynamic groups when we don’t design our queries properly. This is similar to performance issues with dynamic collections with bad WQL queries, and SCCM admins are very familiar with this kind of performance issue.
This post will show how to create dynamic device groups for Windows devices with the “Device Ownership” attribute in Azure AD. This attribute is populated only when the devices are enrolled through MDM, and if I understand correctly, it is inhabited by Intune in this case.
If this attribute is not populated, you must ensure the device is correctly enrolled in Intune. Because some of these attributes are available only when the Intune portal is migrated to Azure, you may need to wait for your Intune migration to complete if you are still using the Intune Silverlight portal.
How to Create Azure AD Dynamic Device Groups for Windows BYOD CYOD Devices Microsoft Intune
Let’s discuss creating an Azure AD device group for Windows BYOD CYOD devices Microsoft Intune. Creating Azure AD device groups for Windows BYOD and CYOD devices with Microsoft Intune is easy. It is explained in detail below.
How to Create Azure AD Dynamic Device Groups for Windows BYOD CYOD Devices Microsoft Intune – Fig.1
Following are the Advanced membership rules that you can use to create Azure AD and dynamic Device groups to segregate BYOD and CYOD devices! All Windows CYOD Devices Query for Azure Active Directory (device.deviceOwnership -contains “company”) -and (device.deviceOSType -contains “Windows”).
All Windows BYOD Devices Query for Azure Active Directory
(device.deviceOwnership -contains "Personal") -and (device.deviceOSType -contains “Windows”)
All BYOD Devices Query for Azure Active Directory (device.deviceOwnership -contains “Personal”) All CYOD Devices Query for Azure Active Directory (device.deviceOwnership -contains “Company”).
How to Create Azure AD Dynamic Device Groups for Windows BYOD CYOD Devices Microsoft Intune – Fig.2
Auditing Azure Active Directory Dynamic groups is very important from the ops teams’ perspective. These auditing options are available in the new Azure portal, and it’s beneficial to track the changes of a particular Azure AD dynamic group.
As you can see in the table below, the ACTOR performed the activity for that group. For example, when I created this group, “Microsoft Approval Management” (probably an AAD automated process in the background) added 2 devices to the device group.
Date
Actor
Activity
Target
3/2/2017, 1:42:18 PM
Microsoft Approval Management
Add member to group
Device : DESKTOP-FOSD7L3, Group : All Windows CYOD Devices
3/2/2017, 1:42:18 PM
Microsoft Approval Management
Add member to group
Device : DESKTOP-IIRCSUV, Group : All Windows CYOD Devices
3/2/2017, 1:31:42 PM
anoop@sSDS.onmicrosoft.com
Add owner to group
User : , Group : All Windows CYOD Devices
3/2/2017, 1:31:42 PM
anoop@sSDS.onmicrosoft.com
Add group
Group : All Windows CYOD Devices
How to Create Azure AD Dynamic Device Groups for Windows BYOD CYOD Devices Microsoft Intune – Table 1
How to Create Azure AD Dynamic Device Groups for Windows BYOD CYOD Devices Microsoft Intune – Fig.3
So, it’s recommended that we look at the best practices when we create dynamic devices or user groups in Azure Active Directory. You may not see performance issues with AAD dynamic groups during testing or POC, but when you migrate all the users into Azure AD, this could undoubtedly impact.
I always try to use -eq rather than -contains in the AAD dynamic rules, but it’s not always possible to use -eq! How to Create Azure AD Dynamic Device Groups for Windows BYOD CYOD Devices Microsoft Intune.
We are on WhatsApp now. To get the latest step-by-step guides, news, and updates, Join our Channel. Click here. HTMD WhatsApp.
Author
Anoop C Nair is Microsoft MVP! He is a Device Management Admin with more than 20 years of experience (calculation done in 2021) in IT. He is a Blogger, Speaker, and Local User Group HTMD Community leader. His main focus is on Device Management technologies like SCCM 2012, Current Branch, and Intune. He writes about ConfigMgr, Windows 11, Windows 10, Azure AD, Microsoft Intune, Windows 365, AVD, etc.
Microsoft Intune will automatically enroll CYO or BYO devices. You can scope automatic enrollment to some Azure AD users, all users, or none. This is an old post, but the concepts are still the same.
The old classic Azure portal offers an option to set up Automatic Intune MDM enrollment for Windows 10 devices. A similar option is available in the new Azure portal, which has new names and a new look. This post explains more details about the Windows 10 Intune Auto Enrollment Process.
One of the first things you must learn is how to use the Intune Admin Portal. This post will help you understand where the Intune admin portal is, officially known as the Microsoft Intune Admin Center.
The Intune Auto Enrollment option will help you perform two (2) things, as explained in the video below. It’s an old video now; the patch to configure auto-enrollment has changed a bit, and I have described it in the new Intune portal walkthrough video below.
First, whenever a Windows 10 device is joined to Azure AD, it will automatically enroll in Intune for MDM Management. Second, only the allowed users in the MDM user scope group can enroll devices in Intune.
Table of Contents
How to Configure Automatic Intune MDM Enrollment | Auto Enrollment – Intune Portal Walkthrough | MEM Admin Center | Training
The Intune Admin Portal, officially known as the Microsoft Endpoint Manager (MEM) Admin Center, is a crucial tool for managing devices and applications within an organization. IT administrators must effectively navigate this portal to oversee and control various aspects of their endpoints.
How to Configure Automatic Intune MDM Enrollment | Auto Enrollment – Video 1
NOTE! – For Windows 10 BYOD devices, the MAM user scope takes precedence if both the MAM user scope and MDM user scope (automatic MDM enrollment) are enabled for all users (or the same groups of users). The device will use Windows Information Protection (WIP) Policies (if you configure them) rather than being enrolled by MDM.
The following is where you can set the MDM enrollment configuration in the new Azure portal. When your MDM User scope is set to None, none of the enrolled devices get the proper policies, and those devices won’t work as expected.
Choose Devices -> Device Onboarding – Enrollment -> Windows in the Microsoft Intune admin centre.
Click on the Automatic Enrollment button.
How to Configure Automatic Intune MDM Enrollment | Auto Enrollment – Fig.1
Select the MDM user Scope to All or Custom Azure AD group per your requirement. If it is set to None, users won’t be able to enroll the devices into Intune management.
The simplest option is to specify “all users” in the MDM user scope so that all the users in your organization can enroll their devices into Intune. Windows 10 devices will automatically enroll in Intune when the users perform Azure AD Join.
User groups can manage this option. When you want to allow a specific group of users to enroll their devices into MDM/Intune, this is the place to configure that user group. Click on the SOME option in the MDM User scope and select the user group to which you want to provide access.
From the same place, you can perform a granular or phase-wise approach to moving users to new MDM management from the same place. This blade has 3 URL options; you can configure these URLs according to your MDM vendor.
How to Configure Automatic Intune MDM Enrollment | Auto Enrollment – Fig.2
Video Windows 10 Intune Auto Enrollment Process
This is an old video recorded using the Azure portal UI. The concept is the same, but the new portal UI has different options.
How to Configure Automatic Intune MDM Enrollment | Auto Enrollment – Video 1
Windows 10 Airwatch Mobileiron Auto Enrollment Process?
If Airwatch or Mobileiron manages your devices, you can specify those. The new Azure portal for Intune automatically configures all the URLs in MDM. This blade has three different URLs.
New Azure Portal for Intune MDM
Description
Link
MDM Terms of use URL
The URL of the terms of use endpoint of the MDM service
This is the URL of the enrollment endpoint of the MDM service. The enrollment endpoint is used to enroll devices for management with the MDM service. The URL given below is the Intune enrollment endpoint URL.
This is the URL of the compliance endpoint of the MDM service. When a user is denied access to a resource from a non-compliance device.URL can navigate to this URL hosted by Intune service in order to understand why their device is considered noncompliant. Users can also initiate self-service remediation so their devices become compliant and they can continue to access resources.
How to Configure Automatic Intune MDM Enrollment | Auto Enrollment – Table 1
How to Configure Automatic Intune MDM Enrollment | Auto Enrollment – Fig.3
So, where is the option in the new Azure portal to configure the MDM auto-enrollment setting for Windows 10 devices and MDM enrollment for the rest of the devices (Android, iOS, and macOS)? The following is where you can configure the Intune MDM enrollment option: Microsoft Azure—Mobility (MDM and MAM).
Windows 10 Intune Auto Enrollment Process Screen capture.
How to Configure Automatic Intune MDM Enrollment | Auto Enrollment – Fig.4
We are on WhatsApp now. To get the latest step-by-step guides, news, and updates, Join our Channel. Click here. HTMD WhatsApp.
Author
Anoop C Nair is Microsoft MVP! He is a Device Management Admin with more than 20 years of experience (calculation done in 2021) in IT. He is a Blogger, Speaker, and Local User Group HTMD Community leader. His main focus is on Device Management technologies like SCCM 2012, Current Branch, and Intune. He writes about ConfigMgr, Windows 11, Windows 10, Azure AD, Microsoft Intune, Windows 365, AVD, etc.
How can I restrict Personal iOS Devices from Enrolling in Intune? Have you already seen the new Intune options in the MEM portal? If not, I recommend watching the following video post to get an overview of the new Intune portal.
The new Intune portal allows for more granular restrictions for MDM enrollments. On-prem services like ADFS or any federated access management system don’t need tweaking.
Now, we can block personal iOS devices from Intune enrollment. You can set this policy at the Enroll Devices node in the Intune Azure portal. Under “Enrolment restrictions,” you can find details about granular enrollment restriction policies.
Enrollment restriction policies help us restrict/block a set of devices from enrolling in Intune. This post explains how to Restrict Personal iOS Devices from Enrolling in Intune Endpoint Manager.
How to Restrict Personal iOS Devices from Enrolling on Intune – Fig.1
How to Restrict Personal iOS Devices from Enrolling on Intune
There are two types of restrictions within enrolment restriction rules: device type and limit restrictions. Device limit restrictions are already available in the Intune Silverlight portal. In contrast, Device Type Restriction is new in the Intune Azure portal, allowing us to restrict or block specific platform devices from enrolling.
How to Restrict Personal iOS Devices from Enrolling on Intune – Table 1
How to Restrict Personal iOS Devices from Enrolling on Intune – Fig.2
You can disable/block Android device enrollment from the new portal to restrict Android devices from enrolling in your Intune MDM enrollment. However, I’m unsure how we can allow ONLY “Android for Work” enabled devices to enrol in Intune.
I hope there are some limitations from the Android platform side to restrict the Android devices that are not enabled for the Android Work type of management.
How to Restrict Personal iOS Devices from Enrolling on Intune – Fig.3
The device type restriction policy is very helpful if you want to restrict Windows Mobile/Phone devices from enrolling into Intune. At the same time, you can allow Windows devices (desktops, laptops, surfaces, etc..) to enrol on Intune.
The most exciting feature, which is very helpful for any organization, is restricting personal iOS devices from enrolling on Intune.
Corporate/company-owned iOS devices can be enrolled using the Apple DEP program.
In this scenario, you need to create an enrollment type policy with the iOS platform enabled for enrollment via Device Type Restrictions — Platforms. Once the iOS platform is enabled for enrollment, go to Platform Configurations and then BLOCK personally owned iOS devices.
For example, when you try to enrol a device in Intune, the Enrollment restriction policies are checked against that device platform and user. Intune will check the device properties and user restriction limits configured in the enrollment restriction policies and confirm that the device platform and user can enrol. After this positive verification, Intune will allow the user to enrol on the device.
How do you restrict personal iOS devices from enrolling in Intune Endpoint Manager?
How to Restrict Personal iOS Devices from Enrolling on Intune – Fig.4
New Intune Home Page Redesign
The newly redesigned Intune Admin Portal Home Pagecomprehensively reviews the changes and the updated Intune Admin Portal Journey. The dynamic Home Page is used for Intune Administrators, and spotlight options highlight premium features, ensuring easy access to key functionalities.
How to Restrict Personal iOS Devices from Enrolling on Intune – Video 1
MEM Admin Portal
Below is a video on the Intune Admin Center Walkthrough for the latest updates. The Intune Admin Portal is one of the first things you must learn. This post explains where the Intune admin portal (aka Endpoint Manager) is. The official name of the Intune admin portal is the MEM Admin Center.
How to Restrict Personal iOS Devices from Enrolling on Intune – Video 2
We are on WhatsApp now. To get the latest step-by-step guides, news, and updates, Join our Channel. Click here. HTMD WhatsApp.
Author
Anoop C Nair is Microsoft MVP! He is a Device Management Admin with more than 20 years of experience (calculation done in 2021) in IT. He is a Blogger, Speaker, and Local User Group HTMD Community leader. His main focus is on Device Management technologies like SCCM 2012, Current Branch, and Intune. He writes about ConfigMgr, Windows 11, Windows 10, Azure AD, Microsoft Intune, Windows 365, AVD, etc.
Quick Overview Comparison between Intune Azure and Silverlight Portal? I’m excited to share the comparison video and post about Intune Silverlight and the new Intune in the MEM portal.
There are many new features and many perfect changes. All the new Azure tenants with a new Microsoft EMS subscription can access a preview version of Intune in the MEM portal.
The Intune console’s performance, look, and feel are far better than those of the Intune Silverlight console. Intune in the MEM portal helps us eliminate the duplication of work needed to create Azure AD and Intune groups.
In the new portal, we can directly deploy applications, policies, profiles, etc… to Azure Active Directory Dynamic device groups and user groups. Enrolment restriction rules and RBA for Intune admins are other most exciting features for me within the new portal.
Quick Overview Comparison between Intune Azure and Silverlight Portal – fig.1
Video Tutorial to know Intune Silverlight Portal Experience
Video tutorial to learn about the Intune Silverlight Portal Experience. The Intune blade in the Azure portal is like a special section where you can manage many things for your devices. It’s part of the Azure portal, where you do all sorts of stuff with your cloud services.
This Intune blade has many new features and tools to help you manage your devices even better.
Quick Overview Comparison between Intune Azure and Silverlight Portal – Video 1
Quick Overview Comparison between Intune Azure and Silverlight Portal
Manage Apps node is where you can create apps from the Android, Apple, and Windows stores. The most exciting feature in Manage Apps is that you can directly search the Apple App Store (Yes, I think for preview, we have only the option to select the US store) and fetch the application from there.
Hence, you don’t need to specify the app’s properties. Deployments in the new MEM portal are called ASSIGNMENTS. You can directly deploy applications to AAD groups. One thing missing in the review version of Intune is an option to upload MSI applications.
Quick Overview Comparison between Intune Azure and Silverlight Portal – fig.2
The Configure Device node is in the new Azure console, where you can create configuration policies for iOS, Android for Work, Android, and Windows devices. Configuration policies in the Intune Silverlight portal have built-in generic policies for Windows, iOS, Android, etc. Similarly, the new Intune portal in Azure has built-in profiles.
We have different profile types, such as Device Restriction policies, WiFi profiles, VPN profiles, SCEP deployment profiles, and eMail profiles. Device restriction policies are the built-in configuration policies for specific device platforms.
Configuration Type
Custom
Quick Overview Comparison between Intune Azure and Silverlight Portal – Table 1
Quick Overview Comparison between Intune Azure and Silverlight Portal – fig.3
Set device compliance is the node where you can create new, improved compliance policies for all the supported devices like iOS, Android, and Windows. The improvement over the Silverlight Intune portal is that we can select the device platform explicitly in the compliance policies.
Also, depending upon the device platform, separate compliance policies will be applied to different devices (even if a user is targeted to iOS, Android, and Windows compliance policies). Compliance policies are deployed via assignments in the Intune portal.
Quick Overview Comparison between Intune Azure and Silverlight Portal – fig.4
The conditional Access node in the new Intune portal has very few options compared to Intune Silverlight conditional access options. All the device-based conditional access rules have been moved out of Intune and are now part of Azure Active Directory. Device-based conditional access policy has loads of granular options, more conditions, more control options, etc.
Quick Overview Comparison between Intune Azure and Silverlight Portal – fig.5
The Enroll Devices node is where you can define enrolment restriction rules. These rules help to prevent devices from enrolling in Intune. The enrolment restriction rule comes before conditional access verification. Within enrolment restriction rules, we can have different types of restrictions, such as Device Type restrictions and Device Limit restrictions.
Device type restriction is where we can select device platforms and platform configurations. The Enroll Devices node is where you can also define/configure Windows Hello for business and check the MDM management authority, Terms and conditions, Corporate device identities, and Apple MDM push certificates.
Quick Overview Comparison between Intune Azure and Silverlight Portal – fig.6
Access control is where we can define custom security permissions for Administrator users. Role-based administrator (RBA) is enabled in the new Intune portal, where you can create your own customized Intune admin roles.
Once you create a security role, you can assign it to a new Member Group and Scope Group. The Intune review portal offers the following permission options: Device Configurations, Managed Apps, Managed Devices, Mobile Apps, Organization, Remote tasks, Roles, Telecom Expenses, and Terms and Conditions.
Quick Overview Comparison between Intune Azure and Silverlight Portal – fig.7
We are on WhatsApp now. To get the latest step-by-step guides, news, and updates, Join our Channel. Click here. HTMD WhatsApp.
Author
Anoop C Nair is Microsoft MVP! He is a Device Management Admin with more than 20 years of experience (calculation done in 2021) in IT. He is a Blogger, Speaker, and Local User Group HTMD Community leader. His main focus is on Device Management technologies like SCCM 2012, Current Branch, and Intune. He writes about ConfigMgr, Windows 11, Windows 10, Azure AD, Microsoft Intune, Windows 365, AVD, etc.
Learn how to Delete Devices from Azure Active Directory | Azure Portal. For effective device management, we need to delete and disable the Azure AD and Intune options.
A device can be retired and deleted from the Intune console (Silverlight), and I’m sure the new MEM portal will indeed have these options.
If you are an SCCM admin, you may recall that the SCCM console has an option to delete and disable a device. However, I have seen that when you retire and delete a device from the Intune console, that device will be removed from the Intune console but will still stay in Azure AD.
Managing devices in Azure Active Directory (AAD) and the Azure portal is crucial for maintaining organizational efficiency and security. The process remains similar whether you need to remove outdated devices or restrict access for specific ones.
Learn How to Delete Devices from Azure Active Directory | Azure Portal | Disable Devices – Table 1
Learn How to Delete Devices from Azure Active Directory | Azure Portal | Disable Devices – Fig.1
Back to delete and disable device options in the new Azure AD portal. We will first cover the disable/enable device option and then discuss the delete option. Consider a hypothetical emergency scenario where you want to disable an AAD device to prevent further damage to your organization.
Go to the MEM portal’s All Users and Groups blade to disable a device. Select All Users and select the Devices option from that blade. This will give you a list of devices. You can choose one device from that list and click on disable/enable the option per the requirement.
You can review the video attached to this post for a real-time experience. We don’t have to disable the option in the Intune console, so the only way to disable a device is from the Azure AD portal. Learn How to Delete Devices from Azure Active Directory | Azure Portal | Disable Devices?
Learn How to Delete Devices from Azure Active Directory | Azure Portal | Disable Devices – Fig.2
Delete Devices from Azure Active Directory
Now, we can see the delete device option in the Azure portal. This is a critical option that is very helpful in keeping your Azure AD environment clean. It will also help device management admins get better results from configuration/compliance policy and application deployments. To disable a device, go to the Azure portal’s All Users and Groups blade here.
Select All Users and the Devices option from that blade. This will give you a list of devices; you can choose one device and click delete.
Learn How to Delete Devices from Azure Active Directory | Azure Portal | Disable Devices – Fig.3
We are on WhatsApp now. To get the latest step-by-step guides, news, and updates, Join our Channel. Click here. HTMD WhatsApp.
Author
Anoop C Nair is Microsoft MVP! He is a Device Management Admin with more than 20 years of experience (calculation done in 2021) in IT. He is a Blogger, Speaker, and Local User Group HTMD Community leader. His main focus is on Device Management technologies like SCCM 2012, Current Branch, and Intune. He writes about ConfigMgr, Windows 11, Windows 10, Azure AD, Microsoft Intune, Windows 365, AVD, etc.
Let’s discuss how to Exclude a Device from Azure AD Dynamic Device Group or Azure Active Directory Dynamic Group.
In my previous post, “How to Create Azure AD Dynamic Groups for Managing Devices via Intune,” we discussed creating Azure AD Dynamic Device or User groups. Another question I usually get is, “How do you remove or Exclude a device from Azure Active Directory Dynamic Device Group?”.
I expect this could be one of the scenarios used in deploying security/configuration policies via Intune. It is a very valid scenario; you can’t avoid it in device management. If you are an experienced SCCM Admin, no explanation is needed.
Removinga single device directly from the AAD Dynamic device group is impossible. Yes, a remove button is available, but when you select a device and click on it, a confirmation popup with a YES button will appear.
Exclude a Device from Azure AD Dynamic Device Group
Clicking the YES button will give an error message stating that you can’t remove the device from the Azure AD dynamic device group: “Failed to remove member LENexus 5 from group _Android Devices.” However, this can be achieved by adding some conditions to the advance membership rule query in AAD dynamic groups.
Device
Details
Member
LGENexus 5
Group
Android Devices
Membership Type
Dynamic
Member Type
Device
How to Exclude a Device from Azure AD Dynamic Device Group | Azure Active Directory Dynamic Groups – Table 1
How to Exclude a Device from Azure AD Dynamic Device Group | Azure Active Directory Dynamic Groups – Fig.1
Advanced rules for AAD Dynamic membership are based on binary expressions. One Azure AD dynamic query can have more than one binary expression. Each binary expression is separated by a conditional operator, either ‘and” or “or“. You can play around with this conditional operator to remove the devices from the AAD dynamic device or user groups.
How to Exclude a Device from Azure AD Dynamic Device Group | Azure Active Directory Dynamic Groups – Fig.2
Following is the advanced membership rule query I used to remove a device in the AAD dynamic device group. In this query, the conditional operator between 2 binary expressions is -and.
I don’t know the result or whether this will work effectively when we deploy a configuration policy via Intune to this AAD device group. I assume it will work because I can see a difference in the device icon called “LGENexus 5.” That is the device that I tried to exclude using the above query.
How to Exclude a Device from Azure AD Dynamic Device Group | Azure Active Directory Dynamic Groups – Fig.3
We are on WhatsApp now. To get the latest step-by-step guides, news, and updates, Join our Channel. Click here. HTMD WhatsApp.
Author
Anoop C Nair is Microsoft MVP! He is a Device Management Admin with more than 20 years of experience (calculation done in 2021) in IT. He is a Blogger, Speaker, and Local User Group HTMD Community leader. His main focus is on Device Management technologies like SCCM 2012, Current Branch, and Intune. He writes about ConfigMgr, Windows 11, Windows 10, Azure AD, Microsoft Intune, Windows 365, AVD, etc.
Learn two things from this post. How to Create Azure AD Dynamic Groups for Managing Devices using Intune? and How to Pause AAD Dynamic Group Update?
This post will see how to create Dynamic device groups and User Groups in Azure Active Directory. Azure AD groups are similar to collections (in the SCCM world) for Intune device management solutions.
So this is very important in the world of modern management of devices using Microsoft Intune. If you are an SCCM admin, the AAD dynamic group is similar to creating a dynamic collection using WQL query rules. AAD groups don’t have that granularity in creating dynamic query rules if you compare them with WQL query rules.
However, the new Azure portal has many options to create dynamic query rules. The video tutorial will help you get more inside AAD Dynamic groups.
Advanced rules for AAD Dynamic membership are based on binary expressions. One Azure AD dynamic query can have more than one binary expression. Each binary expression in the AAD dynamic membership rule query must have 3 parts: the left parameter, the binary operator, and the right constant.
A left parameter in the query rule is one of the attributes of the AAD object (either user or device). If you want to query users in a particular department, then the user is the object, and the department is the attribute (user. department).
A binary operator is only a conditional operator like “-ne,-eq, -contains -match.” The right constant is a constant value specific to your requirement; for example, if you want to create a group for all IT users, it is “IT.”
Let’s take an example of creating an Azure AD dynamic group for Windows devices. The following are the steps to create the AAD dynamic Device group. You must have appropriate permissions to create Azure AD groups. Follow the steps to create the Device group for 22H2.
Select Security – Group Type from the drop-down option.
Enter Group Name “HTMD Windows 11 22H2 Device Group” (any name is fine).
Enter Group Description “HTMD Windows 11 22H2 Device Group” (any description is fine).
Select Dynamic Device as the Membership type.
Click on Add Dynamic Query under Dynamic Device Members.
How to Create Azure AD Dynamic Groups for Managing Devices using Intune | How to Pause AAD Dynamic Group Update – Fig.1
You need to hover over the properties column to get an option to select Azure AD dynamic device groups based on Windows on the Dynamic membership rules page.
You can create or edit rules directly by editing the syntax in the box below. Or you can use the Azure AD portal UI as shown below to create a dynamic group query rule. There are some scenarios where the device properties (e.g. nesting) are not published in the UI property list.
(device.deviceOSVersion -startsWith "10.0.22621")
Click on the SAVE button to save the query rule.
You also have the option to validate the Azure AD query from the Validate Rules tab, as shown in the picture. The section below explains more details.
Dynamic Membership Rules
Details
Property
deviceOSVersion
Operator
Starts With
Value
10.0.22621
How to Create Azure AD Dynamic Groups for Managing Devices using Intune | How to Pause AAD Dynamic Group Update – Table 1
How to Create Azure AD Dynamic Groups for Managing Devices using Intune | How to Pause AAD Dynamic Group Update – Fig.2
You can now click on the CREATE button to complete the process of creating a Windows devices Azure AD dynamic group. You can also change the version numbers to get different results.
How to Create Azure AD Dynamic Groups for Managing Devices using Intune | How to Pause AAD Dynamic Group Update – Fig.3
Microsoft recently added an option to Pause Azure AD Dynamic Group Update. You can perform the PAUSE action from the Azure AD portal itself. You don’t have to do this using Microsoft Graph or any other crazy method.
An accidental deployment happened to the Azure AD dynamic group, and you must reduce the impact. What would be your first step? I think the update pause might help to pause the deployment with immediate effect at least for new devices.
You can navigate to the Azure AD dynamic group that you want to pause. You can enable the Pause Processing option for Azure AD Dynamic groups from the Overview tab.
When the setting is set to YES, the processing of this dynamic group will pause.
When set to NO, processing will continue.
The Dynamic Rule Processing Status = Updates Paused once you enable the Pause Processing option from Azure AD dynamic group. The Dynamic Rule Processing Status shows whether or not this group is processing changes to the dynamic group rules.
This is only applicable when a group is newly created or the rule was recently edited or the Pause Processing setting is changed.
How to Create Azure AD Dynamic Groups for Managing Devices using Intune | How to Pause AAD Dynamic Group Update – Fig.4
Maximum Supported Words/Characters
I did a test to understand the maximum supported words/characters in Azure AD dynamic, advanced membership rule, and I found that we could save a query with a maximum of 311 words and 3045 characters.
When I increased the numbers to 315 words and 3085characters, it gave an error “Failed to create Group_Maxi. Undefined,” where MAXI is the group name.
How to Create Azure AD Dynamic Groups for Managing Devices using Intune | How to Pause AAD Dynamic Group Update – Fig.5
Now back to Intune and device management. I will create 3 basic groups for device management. These AAD dynamic device groups (All Windows Devices, All iOS Devices, and All Android Devices) will be used to deploy different configuration policies.
Dynamic Query
First, I wanted to group all Windows devices in my Intune environment. There are two ways to create an AAD group with dynamic membership query rules 1. Simple rule, and 2. Advanced Rule. It’s better to use simple queries via Azure portal GUI to group Windows devices based on the operating system.
If you want to use advanced membership, then the following is the query “(device.deviceOSType -contains “Windows”).” When you create an Azure AD dynamic device group, it will take 1 or 2 minutes (depending upon the query’s complexity and the database’s size) to populate the devices into the group.
How to Create Azure AD Dynamic Groups for Managing Devices using Intune | How to Pause AAD Dynamic Group Update – Fig.6
It’s time to find iOS devices (iPhone or iPad) in my environment via AAD Dynamic query and group them into an AAD dynamic group. Unlike the Windows device group, the iOS device AAD dynamic Device group can’t be created using a simple membership rule; rather, we should use the Advanced membership rule.
We need to have two constant values like iPhone and iPad. Following is the query that I used to fetch iOS devices (device.deviceOSType -contains “iPhone”) -or (device.deviceOSType -contains “iPad”).
How to Create Azure AD Dynamic Groups for Managing Devices using Intune | How to Pause AAD Dynamic Group Update – Fig.7
OK, here we go with a grouping of Android devices. In this scenario, I want to create an AAD dynamic device group using a simple membership rule.
Because I don’t have more than one constant value in the AAD group binary expression. Following is the dynamic query for the Android device group “(device.deviceOSType -contains “Android”).”
How to Create Azure AD Dynamic Groups for Managing Devices using Intune | How to Pause AAD Dynamic Group Update – Fig.8
Author
Anoop is Microsoft MVP! He is a Solution Architect in enterprise client management with more than 20 years of experience (calculation done in 2021) in IT. He is a blogger, Speaker, and Local User Group HTMD Community leader. His main focus is on Device Management technologies like SCCM 2012, Current Branch, and Intune. E writes about ConfigMgr, Windows 11, Windows 10, Azure AD, Microsoft Intune, Windows 365, AVD, etc…